Halloween sugar cookies hold a special place in my kitchen because they’re a perfect mix of simplicity and fun. I love how the dough feels under my fingertips—soft but resilient, ready to be shaped into spooky faces or playful pumpkins. They’ve become a tradition, a way to add a little chaos and color to an otherwise dark night.
Why I Keep Coming Back to These Cookies
They’re forgiving—cracked, imperfect edges add character. I love how they remind me of childhood Halloweens, with a new twist each year. Plus, I can personalize every batch, making each one a little different. They’re a messy, joyful way to celebrate the season.
Ingredients & Their Secrets in Halloween Sugar Cookies
- Butter: Adds richness and tender crumb. Use unsalted for better control of salt.
- Granulated sugar: Sweetens and helps with browning. You can swap for coconut sugar for a deeper flavor.
- Egg: Acts as a binder and adds moisture. Use a flax egg for vegan options.
- Vanilla extract: Gives warmth and depth. Lemon or orange zest can brighten the flavor.
- Flour: Provides structure. Whole wheat works, but expect a denser cookie.
- Baking soda: Leavens the dough. Too much causes spreading; measure carefully.
- Salt: Enhances sweetness and balances flavors.
Tools & Equipment for Spooky Sugar Cookies
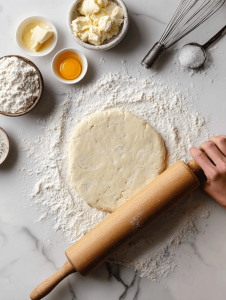
- Rolling pin: To evenly roll out the dough.
- Cookie cutters: To cut out fun Halloween shapes.
- Baking sheet: To hold the cookies as they bake.
- Parchment paper: To prevent sticking and facilitate cleanup.
- Icing spatula: For smooth icing application.
Crafting the Perfect Spooky Sugar Cookies
Step 1: Preheat your oven to 180°C (350°F).
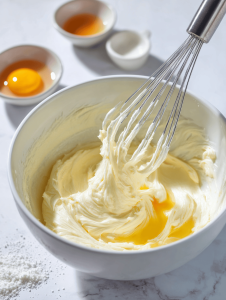
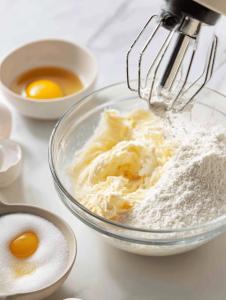
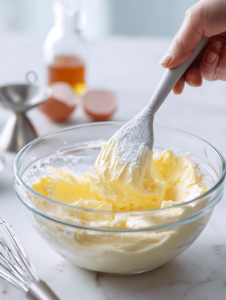
Step 2: In a mixing bowl, cream together butter and sugar until fluffy, about 2-3 minutes.
Step 3: Add egg and vanilla, mix until combined.
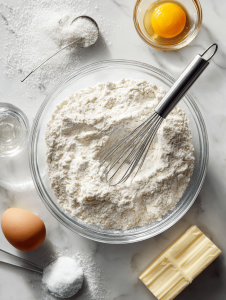
Step 4: Gradually add flour, baking soda, and salt. Mix just until the dough comes together.
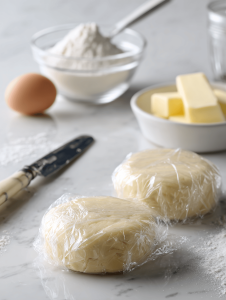
Step 5: Divide dough in half, wrap in plastic, and chill for at least 30 minutes.
Cooking Checkpoints & Tips for Halloween Sugar Cookies
- Dough should be firm but pliable, not sticky or crumbly.
- Edges of cookies should be golden, not burnt.
- Icing should set with a slight sheen, not sticky to touch.
Common Mistakes & How to Fix Them
- Sticky dough that’s hard to roll.? Dough is too sticky? Chill it longer or dust with more flour.
- Flattened, spread-out cookies.? Cookies spread too much? Chill before baking or use less baking soda.
- Thin, drippy icing.? Icing is runny? Add more powdered sugar.
- Overly dark cookie edges.? Burnt edges? Reduce oven temperature or move baking sheet to middle rack.

Halloween Sugar Cookies
Ingredients
Equipment
Method
- In a large mixing bowl, beat the softened butter and sugar together until the mixture is light, fluffy, and has turned a pale yellow, about 2-3 minutes. You should hear a gentle whir and see the color brighten.

- Add the egg and vanilla extract to the bowl and continue mixing until well combined, about 30 seconds. The mixture will look smooth and slightly glossy.
- In a separate bowl, whisk together the flour, baking soda, and salt. Gradually add this dry mixture to the wet ingredients, mixing just until the dough begins to come together and no streaks of flour remain. The dough will look soft but manageable.
- Divide the dough in half, shape each portion into a flat disk, wrap tightly in plastic wrap, and chill in the refrigerator for at least 30 minutes. This relaxes the gluten and makes the dough easier to roll out.
- Preheat your oven to 180°C (350°F). Line a baking sheet with parchment paper to prevent sticking.
- Remove one dough disk from the refrigerator and place it on a lightly floured surface. Use a rolling pin to roll the dough out to about 1/4 inch thickness, applying even pressure and turning the dough as you roll to maintain a uniform thickness. The dough should feel firm but pliable, and be about the size of your cookie cutter.
- Use Halloween-themed cookie cutters to cut out shapes from the dough. Carefully transfer the cutouts to your prepared baking sheet, spacing them about 1 inch apart to allow for spreading.
- Bake the cookies in the preheated oven until the edges are golden brown, about 8-10 minutes. Keep an eye on them to prevent over-baking or burning the edges. The cookies should be firm around the edges but still soft in the center.
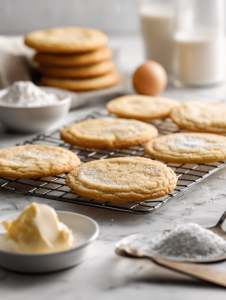
- Once baked, transfer the cookies to a wire rack to cool completely. The edges will crisp up slightly as they cool, making them perfect for decorating.
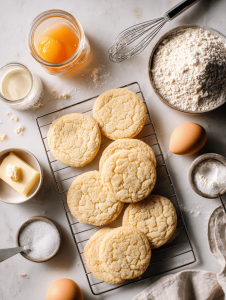
- Decorate the cooled cookies with icing, sprinkles, or edible markers to create spooky Halloween faces, pumpkins, or other fun designs. Let any decorated cookies set for a few minutes before serving.
Notes

Welcome to Owning This Stove. I’m so glad you’re here. I’m a food blogger, recipe developer, and storyteller who believes food is one of the most honest ways to understand a place, a person, or a moment in time. This blog is where I collect those moments, from quiet mornings in unfamiliar kitchens to crowded cafés filled with conversation and clinking cups.