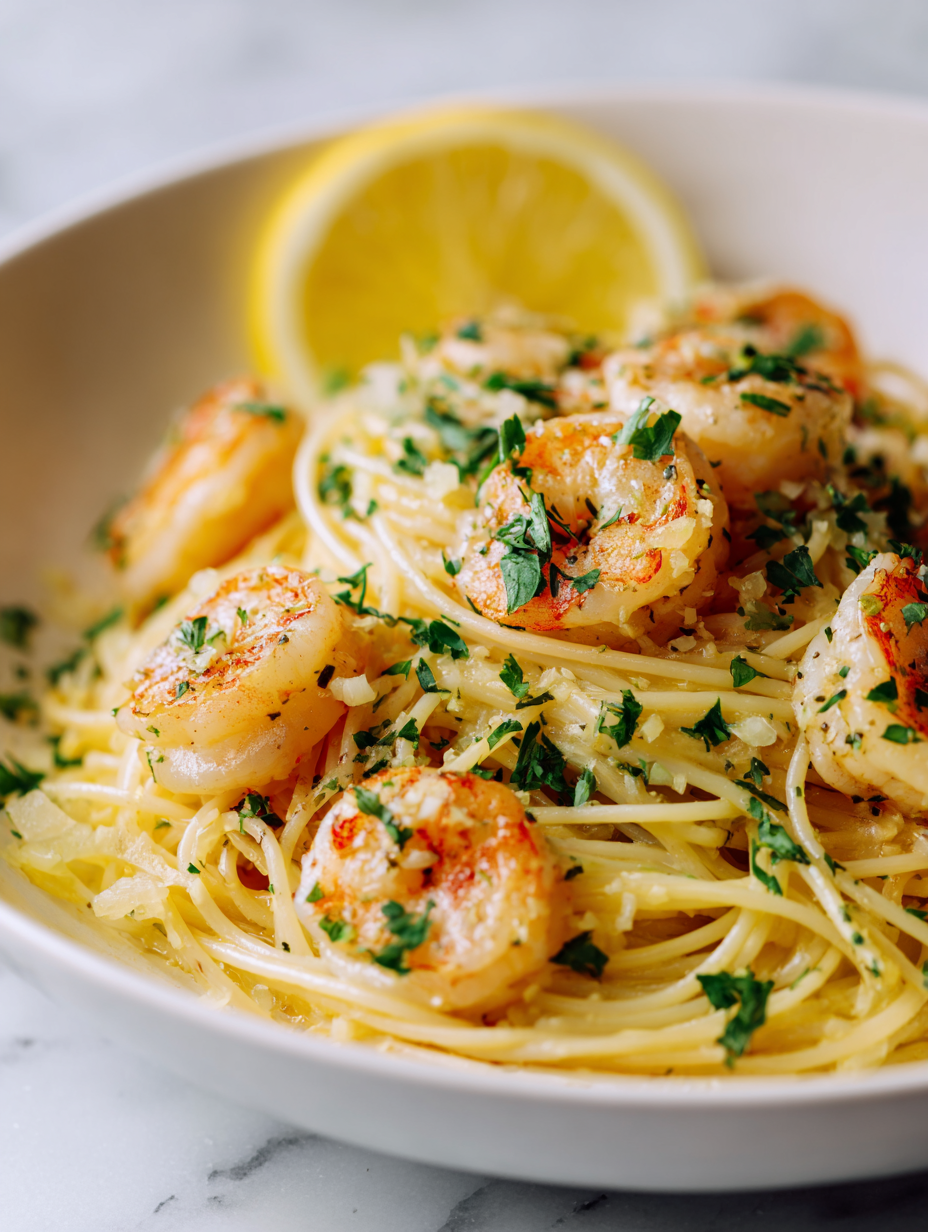
Author: EllaDavis

  • Slow Roasted Butternut Squash Soup for Lazy Weekends

    Slow Roasted Butternut Squash Soup for Lazy Weekends

    Imagine an autumn afternoon, the air filled with the sweet scent of roasting squash and warming spices. This easy roasted butternut squash soup is perfect for those days when you crave comfort without the fuss. The magic happens as the squash caramelizes slowly in the oven, developing a depth of flavor that stovetop methods just can’t match.

    My approach takes a little longer—slow roasting, not hurried boiling— but the result is a velvety, richly sweet soup that requires minimal stirring. It’s what I make when I want to transform simple ingredients into something soulful and satisfying. Plus, the kitchen smells incredible while it bubbles softly in the oven, making cleanup almost a distant afterthought.

    Roasted Butternut Squash Soup

    This roasted butternut squash soup involves slow roasting chunks of squash until caramelized for a deep flavor, then blending them into a smooth, velvety puree. The dish has a rich, naturally sweet taste with a creamy texture that’s perfect for cozy autumn days.
    Prep Time 10 minutes
    Cook Time 45 minutes
    Total Time 55 minutes
    Servings: 4
    Course: Main Course
    Cuisine: Healthy
    Calories: 180

    Ingredients
      

    • 1 large butternut squash peeled, seeded, and cut into chunks
    • 2 tablespoons olive oil for roasting
    • 1 small onion chopped
    • 2 cloves garlic minced
    • 4 cups vegetable broth or chicken broth
    • 1/2 teaspoon ground cinnamon optional, for warmth
    • to taste salt and pepper for seasoning
    • 1 cup heavy cream or coconut milk for creaminess, optional

    Equipment

    • Baking sheet
    • Blender or Immersion Blender
    • Mixing bowl
    • Knife
    • Cutting board

    Method
     

    1. Preheat your oven to 400°F (200°C). Line a baking sheet with parchment paper or lightly grease it.
    2. Spread the chunks of butternut squash on the baking sheet, drizzle with olive oil, and toss to coat evenly.
    3. Roast the squash in the oven for about 30-40 minutes, until the edges are golden brown and the flesh is tender when poked with a fork.
    4. While the squash roasts, chop the onion and mince the garlic. Sauté them in a large pot with a splash of oil over medium heat until the onion is soft and translucent, about 5 minutes.
    5. Remove the roasted squash from the oven and add the soft flesh into the pot with the sautéed onions and garlic.
    6. Pour in the vegetable broth and add the cinnamon, then bring the mixture to a gentle simmer. Let it cook for 10 minutes to allow the flavors to meld.
    7. Use an immersion blender or transfer the mixture carefully to a blender to blend until smooth and velvety. Return it to the pot if needed.
    8. Stir in the heavy cream or coconut milk for added richness, and season with salt and pepper to taste.
    9. Heat the soup gently until warmed through, then ladle into bowls and serve hot.

    This soup is a reminder that sometimes, taking the scenic route in the kitchen yields the most flavorful results. It’s perfect for chilly evenings when you want something nourishing that feels like a warm hug from the oven. Store leftovers in the fridge for a quick lunch tucked into a cozy corner of your day.

    As the season shifts, this recipe becomes a staple—easy, adaptable, and packed with the comforting aroma of roasted squash. It’s more than just a meal; it’s a moment of slow, mindful cooking that turns ordinary ingredients into something memorable. Enjoy every spoonful as part of your seasonal culinary season.

  • Enchanted Witch Fingers: A Halloween Treat Steeped in Nostalgic Mischief

    Enchanted Witch Fingers: A Halloween Treat Steeped in Nostalgic Mischief

    As the leaves outside crunch underfoot, I find comfort in whipping up these creepy cookies. They’re perfect for sharing with friends who love a good scare, or for a solo spooky baking night that leaves your fingers sticky and your spirits high. This holiday, embrace the chaos — because what’s Halloween without a little delicious disaster?

    Creepy Halloween Cookies

    These cookies are soft and chewy with a slightly crisp exterior, shaped into spooky forms and decorated to resemble creepy creatures. Made with basic cookie dough ingredients like butter, sugar, and flour, they are baked until golden and then decorated with icing and candy to create their haunted appearance.
    Prep Time 20 minutes
    Cook Time 12 minutes
    Total Time 32 minutes
    Servings: 24
    Course: Main Course
    Cuisine: Halloween
    Calories: 150

    Ingredients
      

    • 1 cup unsalted butter softened
    • 1 cup granulated sugar
    • 1 large egg beaten
    • 1 tsp vanilla extract
    • 2 1/2 cups all-purpose flour
    • 1/2 tsp baking powder
    • 1/4 tsp salt
    • royal blue, black, and red icing decorative icing for decorating the creepy features
    • candy eyes, candy claws, or sprinkles candy decorations optional but adds to creepiness

    Equipment

    • Mixing bowls
    • Rolling pin
    • Baking sheet
    • Parchment paper
    • Cookie cutters (optional)
    • Cooling rack
    • Decorating tools

    Method
     

    1. In a large mixing bowl, beat together the softened butter and sugar until the mixture is light and fluffy, and smells sweet and toasted.
    2. Mix in the beaten egg and vanilla extract until fully incorporated, giving the dough a glossy, slightly sticky appearance.
    3. In a separate bowl, whisk together the flour, baking powder, and salt to combine dry ingredients evenly.
    4. Gradually add the dry mixture to the wet ingredients, stirring until the dough comes together and feels soft but manageable.
    5. Divide the dough in half, shape into disks, and wrap each in plastic wrap. Chill in the refrigerator for about 30 minutes to help it relax.
    6. Preheat your oven to 350°F (175°C). Line baking sheets with parchment paper.
    7. Remove one dough disk from the fridge, and on a lightly floured surface, roll it out to about 1/4-inch thickness.
    8. Use cookie cutters or a knife to cut out spooky shapes—circles, ghosts, or monsters—and place them onto the prepared baking sheet.
    9. Bake in the oven for 10-12 minutes, until the edges are golden and the cookies are slightly puffed.
    10. Once cooled completely, use the decorative icing and candy to add creepy eyes, mouths, claws, and other spooky features to each cookie.
    11. Display the cookies on a platter to showcase their haunted faces, ready to serve for your Halloween gathering.

    Notes

    For best results, keep the dough chilled to maintain shape during baking. Feel free to get creative with your decorations to enhance the creepy effect.
    So let your imagination run wild in the kitchen, and don’t shy from the delicious mess. There’s something satisfying about crafting these eerie treats—and even more so watching friends and family recoil and laugh when they see them. This season, celebrate the fun of spooky baking that heightens every gory detail.

  • Spooky, Surprising Halloween Eyeball Pasta: A Sock Puppet of a Dish!

    Spooky, Surprising Halloween Eyeball Pasta: A Sock Puppet of a Dish!

    Halloween dinner ideas often lean towards the creepy, but this Eyeball Pasta takes it into unexpected territory. It’s like dinner theater on your plate, where each meatball wears its own tiny eyeball made of cheese and olives. The smell of garlic and baked meatballs mixing with the crispy pasta edges is oddly comforting, yet delightfully unsettling.

    This recipe isn’t just fun; it’s a visual surprise that gets everyone talking. Assembling the “eyeballs” gives a little chaos and pride to the process, especially when you see the kids’ eyes widen with glee. It’s a perfect blend of spooky aesthetics and hearty, satisfying pasta that makes every bite memorable.

    Eyeball Pasta

    This dish features baked meatballs embedded with cheese and olives to resemble eyeballs, served over crispy pasta. The pasta is baked until edges are golden and slightly crunchy, with meatballs roasted to a juicy interior, and the eyeballs made visually striking with cheese and olive accents. The final presentation combines hearty textures with playful, spooky elements.
    Prep Time 20 minutes
    Cook Time 30 minutes
    Total Time 50 minutes
    Servings: 4
    Course: Main Course
    Cuisine: American
    Calories: 620

    Ingredients
      

    • 400 grams spaghetti pasta uncooked
    • 500 grams ground beef for meatballs
    • 1 cup breadcrumbs for binding
    • 1 large egg to help hold meatballs together
    • 2 cloves garlic minced
    • 1 cup shredded mozzarella cheese for eyeballs
    • 10 pitted green olives for eyeballs
    • 2 tablespoons olive oil for coating and baking
    • 2 teaspoons dried oregano seasoning for meatballs
    • 1 teaspoon salt for seasoning
    • 0.5 teaspoon black pepper for seasoning

    Equipment

    • Baking sheet
    • Large mixing bowl

    Method
     

    1. Preheat your oven to 400°F (200°C) and bring a large pot of salted water to a boil. Cook the spaghetti until al dente, then drain and set aside.
    2. In a large mixing bowl, combine the ground beef, breadcrumbs, egg, minced garlic, oregano, salt, and pepper. Mix everything together until well integrated, creating a flavorful meat mixture.
    3. Shape the mixture into small, uniform meatballs, about 1 inch in diameter, and place them on a baking sheet lined with parchment paper.
    4. Bake the meatballs in the preheated oven for about 20 minutes, until they are cooked through and slightly browned on the outside.
    5. While the meatballs bake, prepare your eyeballs by slicing the olives in half and inserting small pieces of cheese into the hollows to resemble pupils. Set aside.
    6. Once the meatballs are done, let them cool slightly, then carefully press an olive with cheese into the top of each meatball to create the eyeball effect.
    7. Toss the cooked pasta with olive oil, spreading it evenly on a baking sheet. Bake for 10-12 minutes, until edges are crispy and golden brown.
    8. Arrange the crispy pasta on a serving platter or individual plates. Top with the baked meatballs arranged to resemble a spooky, eyeball-themed presentation.
    9. Optional: Garnish with additional herbs or a drizzle of olive oil for extra flavor and visual appeal.
    10. Enjoy your creepy yet hearty Eyeball Pasta, perfect for Halloween dinner fun!
    As you gather around your Halloween table, the Eyeball Pasta makes a playful centerpiece that sparks giggles and cheers. It’s a reminder that food can be both fun and delicious, especially when crafted with a dash of imagination. This dish is great for those last-minute spooky dinners or a surprise twist during a weekend movie night.

    Enjoy the process, and don’t forget to take a moment to appreciate its quirky charm. With fall in the air and ghosts of Halloween past whispering, this pasta offers a perfect blend of festive spirit and comfort food, all served up with a side of laughter.

  • Transform Your Fall Mornings with These Pickle Pumpkin Muffins

    Transform Your Fall Mornings with These Pickle Pumpkin Muffins

    Imagine waking up to the cozy scent of pumpkin mingling with a hint of spice, but with a surprising twist—pickles! This recipe combines the warm nostalgia of pumpkin muffins with a quirky, savory surprise that will make you rethink your breakfast routine. It’s a playful take perfect for those who love a little chaos in their baking.

    The secret ingredient might seem odd, but it adds a subtle tang that balances the sweet squash flavor beautifully. Plus, it’s a conversation starter at brunch or breakfast gatherings. Buckle up: this muffin challenge will turn your kitchen into a fun experimental lab.

    Pumpkin Pickle Muffins

    This recipe produces moist, tender muffins that combine the sweet, flavorful essence of pumpkin with a surprising tang from pickles. The batter is mixed and folded, then baked until golden and fluffy, resulting in a visually appealing muffin with a slightly textured crumb and a balanced savory-sweet profile.
    Prep Time 15 minutes
    Cook Time 20 minutes
    Total Time 35 minutes
    Course: Main Course
    Cuisine: American
    Calories: 180

    Ingredients
      

    • 1 cup pumpkin purée unsweetened
    • 1/2 cup pickles finely chopped
    • 1 cup all-purpose flour
    • 1/2 cup brown sugar
    • 1/4 cup vegetable oil
    • 2 large eggs
    • 1 tsp baking powder
    • 1/2 tsp ground cinnamon
    • 1/4 tsp ground ginger
    • Pinch salt

    Equipment

    • Mixing bowls
    • Whisk
    • Muffin tin or liner
    • Measuring cups and spoons
    • Paddle or spatula

    Method
     

    1. Preheat your oven to 375°F (190°C) and line a muffin tin with paper liners or grease it lightly.
    2. In a large mixing bowl, whisk together the pumpkin purée, eggs, and brown sugar until the mixture is smooth and slightly frothy.
    3. Gradually pour in the vegetable oil, stirring continuously to combine everything into a glossy, cohesive batter.
    4. In a separate bowl, sift together the flour, baking powder, cinnamon, ginger, and salt to evenly distribute the leavening and spices.
    5. Fold the dry ingredients into the wet mixture gently with a spatula, just until combined to avoid overmixing.
    6. Stir in the finely chopped pickles, ensuring they are evenly dispersed throughout the batter. The mixture will look slightly textured with tiny bits.
    7. Spoon the batter evenly into the prepared muffin tins, filling each cup about three-quarters full.
    8. Bake in the preheated oven for about 20 minutes, or until a toothpick inserted into the center of a muffin comes out clean and the tops are golden brown.
    9. Once baked, remove the muffins from the oven and let them cool in the tin for 5 minutes, then transfer to a wire rack to cool completely.
    10. Serve the muffins warm or at room temperature, enjoying the combination of moist pumpkin and the tangy pickles with every bite.

    Notes

    For added flavor, try adding a sprinkle of coarse salt on top before baking or a drizzle of honey after cooling.
    As the muffins cool, their aroma lingers like a promise of more to come. These pickled pumpkin muffins may not be your everyday treat, but they’ll surely be a memorable one. Perfect for crisp mornings or lazy weekends, they bring joy with every bite.

    This unexpected combo proves that baking is about creativity and having fun. No matter your usual recipe repertoire, these muffins could become your new favorite twist—one that surprises and delights every time.

  • Harvest Comfort: Creamy Fall Pumpkin Soup with a Surprising Twist

    Harvest Comfort: Creamy Fall Pumpkin Soup with a Surprising Twist

    As the leaves turn amber and the air takes on a crisp edge, I find myself craving more than just the usual pumpkin puree. This year, I decided to elevate that classic fall flavor by adding a hint of roasted garlic and a splash of coconut milk for extra creaminess. It’s a cozy bowl of warmth that’s perfect for those chilly evenings when you want comfort with a twist.

    This soup isn’t just about flavor; it’s about capturing the spirit of fall in every spoonful. The aroma of roasting pumpkins mingling with toasted spices makes my kitchen smell like a wandering autumn orchard. It’s surprisingly quick to whip up, making it a great choice even on busy weekdays. Forget the canned stuff—this soup tastes like golden sunshine with every bite.

    Roasted Pumpkin Soup with Garlic and Coconut Milk

    This pumpkin soup is made by roasting fresh pumpkin to enhance its natural sweetness, then blending it with garlic and coconut milk to create a smooth, creamy texture. The final dish has a velvety consistency with a warm, inviting orange hue, served hot with optional garnishes.
    Prep Time 15 minutes
    Cook Time 45 minutes
    Total Time 1 hour
    Servings: 4
    Course: Main Course
    Cuisine: American
    Calories: 220

    Ingredients
      

    • 1 kg fresh pumpkin or butternut squash peeled, seeded, and cut into chunks
    • 4 cloves garlic whole cloves, peeled
    • 1 can (400ml) coconut milk
    • 2 tablespoons olive oil for roasting and sautéing
    • 1 teaspoon ground cumin
    • to taste salt and pepper

    Equipment

    • Baking sheet
    • Blender or Immersion Blender
    • Large pot or Dutch oven

    Method
     

    1. Preheat the oven to 200°C (400°F). Spread the pumpkin chunks on a baking sheet, drizzle with olive oil, and toss to coat evenly. Roast for about 25-30 minutes until the pumpkin is tender and slightly caramelized around the edges.
    2. While the pumpkin roasts, peel the garlic cloves and set aside. Once the pumpkin is ready, remove it from the oven and let it cool slightly.
    3. Heat a large pot or Dutch oven over medium heat. Add a tablespoon of olive oil and sauté the peeled garlic cloves until fragrant, about 1-2 minutes, taking care not to burn them.
    4. Add the roasted pumpkin pieces to the pot and stir to coat with the garlic and oil. Cook for another 2-3 minutes, allowing the flavors to meld and the pumpkin to warm through.
    5. Pour in the coconut milk and add the ground cumin. Bring the mixture to a gentle simmer, blending the flavors and heating everything through for about 10 minutes.
    6. Use an immersion blender or transfer the soup in batches to a blender and purée until smooth and creamy. Return the soup to the pot if needed, and season with salt and pepper to taste.
    7. Check the consistency and adjust with a little water or more coconut milk if you prefer a thinner soup. Warm through for another 2-3 minutes, then ladle into bowls.
    8. Serve the soup hot, garnished with your favorite toppings like fresh herbs or a drizzle of coconut milk, if desired. Enjoy the rich, velvety flavors of this cozy fall dish.

    Notes

    For extra flavor, add a sprinkle of toasted pumpkin seeds or a swirl of extra coconut milk before serving.

    Sharing this creamy pumpkin soup has become a seasonal tradition in my home. Its velvety texture and balanced spice bring a sense of nostalgia that feels just right as the days grow shorter. I love how it manages to feel both indulgent and nourishing at the same time.

    As the leaves continue to fall, this soup reminds me of the simple joys of fall cooking. It’s a dish that celebrates the bounty of the season without fuss. Whether served as a starter or a meal on its own, it’s a warm, satisfying way to embrace the changing months.

  • The Cozy Art of Reinventing Chicken Noodle Soup with a Twist

    The Cozy Art of Reinventing Chicken Noodle Soup with a Twist

    Sometimes, chicken noodle soup gets a bad rap as a comfort food everyone takes for granted. I decided to challenge that by adding a touch of unexpected zest—a splash of lemon and a hint of fresh herbs—that elevates it from simple to spectacular. The aroma of simmering broth with a citrusy lift can transform a gloomy day into a bright one.

    Each spoonful delivers a melody of flavors: tender chicken, al dente noodles, and a burst of fresh herbs dancing on your palate. This isn’t just about nostalgia; it’s about giving a well-loved classic a new life. The secret lies in the tiniest tweaks that make a huge difference in flavor and feel.

    Lemon Herbed Chicken Noodle Soup

    This chicken noodle soup is prepared by simmering tender chicken in a flavorful broth, adding al dente noodles and fresh herbs. A splash of lemon brightens the soup, creating a final dish with a clear, comforting appearance and a well-balanced texture of juicy chicken, tender noodles, and aromatic herbs.
    Prep Time 15 minutes
    Cook Time 30 minutes
    Total Time 45 minutes
    Servings: 4
    Course: Main Course
    Cuisine: American
    Calories: 320

    Ingredients
      

    • 1 lb boneless, skinless chicken breasts preferably fresh
    • 8 cups chicken broth
    • 2 cups egg noodles or your preferred pasta
    • 2 tbsp olive oil
    • 3 cloves garlic minced
    • 1 medium onion chopped
    • 1 cup carrots diced
    • 2 stalks celery chopped
    • 1 lemon lemon zested and juiced
    • 1/4 cup fresh parsley chopped
    • 0.5 teaspoon fresh thyme chopped
    • to taste salt and pepper

    Equipment

    • Large Stockpot
    • Wooden Spoon

    Method
     

    1. Heat the large stockpot over medium heat and add the olive oil. Once shimmering, add the chopped onion, carrots, and celery. Sauté for about 5 minutes until the vegetables soften and become fragrant.
    2. Add the minced garlic to the pot and cook for another minute until it releases a strong, inviting aroma.
    3. Place the chicken breasts into the pot and pour in the chicken broth, bringing the mixture to a gentle boil.
    4. Reduce the heat to low, cover the pot, and let the chicken simmer for about 15 minutes until cooked through and tender.
    5. Remove the chicken from the broth and transfer it to a cutting board to cool slightly. While it cools, increase the heat to bring the broth back to a gentle simmer.
    6. Shred the cooled chicken into bite-sized pieces and return it to the simmering broth. Add the chopped parsley, thyme, lemon zest, and a squeeze of lemon juice for brightness.
    7. Stir in the egg noodles and cook for about 8 minutes until tender and cooked through, stirring occasionally to prevent sticking.
    8. Taste the soup and season with salt, pepper, and more lemon juice if desired. The soup should be flavorful, with a fresh citrus aroma.
    9. Once the noodles are tender and the flavors meld together, remove the soup from heat and ladle into bowls.
    10. Garnish with additional chopped parsley and a wedge of lemon for serving, if desired. Enjoy this bright and comforting chicken noodle soup.

    In times when quick comfort food is needed without sacrificing freshness, this revamped chicken noodle soup shines. It’s perfect for cozy weekends or when you want nourishing warmth in a bowl with a little more zing. The vibrant flavors remind me that even the simplest dishes hold endless potential for excitement.

    This recipe also offers a chance to get creative with what’s in your pantry—any leftover veggies or herbs can brighten it further. It’s a reminder that cooking is an act of love and innovation, even in the smallest kitchen moments. Enjoy each spoonful, knowing you made something both comforting and uniquely yours.

  • Unusual Twist: Fluffy Pumpkin Pancakes with a Secret Ingredient

    Unusual Twist: Fluffy Pumpkin Pancakes with a Secret Ingredient

    As autumn leaves start to carpet the sidewalks and the air turns crisp, I find myself craving comfort foods that also awaken my senses. These pumpkin pancakes do more than just warm you up—they surprise you with an unexpected hint of toasted sage and a touch of maple-bacon crumble. Its a nostalgic breakfast with a chaotic twist that feels both familiar and novel.

    What makes these pancakes stand out? Its the secret ingredient: a splash of browned butter in the batter that elevates every bite, adding a nutty depth against the sweet pumpkin. The aroma alone, of spiced pumpkin and sizzling butter, is enough to spark early morning excitement. Baking these feels like crafting a little piece of seasonal magic, except itss mess-free and irresistibly tasty.

    Pumpkin Pancakes with Sage and Maple-Bacon Crumble

    This pancake recipe incorporates pumpkin puree into a batter flavored with warm spices, cooked on a griddle until golden brown. The finished pancakes have a fluffy, moist interior with crispy edges, accented by toasted sage and a crunchy maple-bacon topping for added savory sweetness.
    Prep Time 15 minutes
    Cook Time 15 minutes
    Total Time 30 minutes
    Servings: 4
    Course: Main Course
    Cuisine: American
    Calories: 350

    Ingredients
      

    • 1 cup all-purpose flour sifted
    • 2 tablespoons brown sugar
    • 1 teaspoon baking powder
    • 1/2 teaspoon baking soda
    • 1/2 teaspoon ground cinnamon optional
    • 1/4 teaspoon ground nutmeg optional
    • 1/4 teaspoon ground ginger optional
    • 1/4 teaspoon salt
    • 1 cup pumpkin puree unsweetened
    • 1 cup buttermilk
    • 2 large eggs
    • 4 tablespoons unsalted butter for browned butter
    • 4 strips bacon cooked and crumbled
    • 2 tablespoons maple syrup
    • 1 fresh sage leaves toasted until fragrant

    Equipment

    • Mixing bowls
    • Whisk
    • Griddle or large skillet
    • Spatula
    • Measuring cups and spoons

    Method
     

    1. Melt the butter in a small saucepan over medium heat until it turns golden brown and gives off a nutty aroma. Remove from heat and let it cool slightly.
    2. In a large mixing bowl, whisk together the sifted flour, brown sugar, baking powder, baking soda, spices, and salt to combine evenly.
    3. Add the pumpkin puree, buttermilk, eggs, and browned butter to the dry ingredients. Whisk until just combined; the batter should be slightly lumpy but smooth.
    4. Heat the griddle or skillet over medium heat until hot, then lightly grease with butter or oil.
    5. Pour 1/4 cup of batter onto the griddle for each pancake. Cook until bubbles form on the surface and the edges look set, about 2-3 minutes.
    6. Flip the pancakes carefully with a spatula and cook for another 2 minutes until golden brown and cooked through.
    7. While pancakes cook, toast the sage leaves in a dry skillet over medium heat until fragrant and slightly crispy, about 1 minute per side.
      1 cup all-purpose flour
    8. Cook the bacon strips until crispy, then crumble into small pieces. Mix the maple syrup with the crumbled bacon for a sweet-savory topping.
      1 cup all-purpose flour
    9. Arrange the cooked pancakes on a serving plate, drizzle with the maple-bacon crumble, and garnish with toasted sage leaves.
      1 cup all-purpose flour
    10. Serve the pumpkin pancakes warm, enjoying the combination of sweet pumpkin, fragrant sage, and crispy bacon topping.

    Notes

    For extra flavor, try adding a dash of vanilla extract to the batter. These pancakes are best enjoyed fresh but can be kept warm in a low oven.

    These pumpkin pancakes are perfect for embracing fall’s flavors while keeping things simple and inventive. Theyre a gentle reminder that breakfast can be playful, even in the busiest mornings. Enjoy the warm glow of pumpkin spices and the delicate crunch of toasted toppings as you start your day with a cozy, homemade hug.

    Every bite carries a little whisper of fall, wrapped in fluffy comfort. Whether for a hurried weekend breakfast or a leisurely Sunday morning, this recipe brings joy with minimal effort. Savor each forkful knowing you’ve turned a simple pancake into something truly special—something worth sharing at any seasonal table.

  • The Secret Ingredient That Elevates Peach Crumble Beyond Ordinary

    The Secret Ingredient That Elevates Peach Crumble Beyond Ordinary

    Imagine turning ripe, fragrant peaches into a symphony of flavors with a simple trick that only a few bakers dare to try. This recipe explores an unusual twist by infusing the peaches with a hint of rosemary, surprising the senses and adding depth to the classic crumble.

    Watching the sugary topping crisp up in the oven, releasing a caramelized aroma mixed with hints of herbal freshness, makes every baking session a small celebration. As the crunch gives way to the tender fruit beneath, you find a balance that feels both nostalgic and refreshingly novel. It’s a dessert that screams summer with each bite.

    Rosemary Peach Crumble

    This peach crumble combines ripe, fragrant peaches infused with a hint of rosemary, topped with a crisp sugar and oat crumble. The baked dessert features tender fruit beneath a caramelized, crunchy topping, showcasing a balance of fruity sweetness and herbal freshness.
    Prep Time 15 minutes
    Cook Time 40 minutes
    Total Time 55 minutes
    Servings: 4
    Course: Main Course
    Cuisine: American
    Calories: 280

    Ingredients
      

    • 5 large ripe peaches pitted and sliced
    • 1 teaspoon fresh rosemary finely chopped
    • 1/2 cup granulated sugar
    • 1 tablespoon lemon juice
    • 1 cup rolled oats
    • 3/4 cup all-purpose flour
    • 1/2 cup brown sugar
    • 1/2 cup cold unsalted butter cut into small cubes
    • 1 pinch salt

    Equipment

    • Mixing bowls
    • Baking dish
    • Pastry cutter or fork
    • Oven

    Method
     

    1. Preheat the oven to 375°F (190°C). In a mixing bowl, toss the sliced peaches with lemon juice, granulated sugar, and finely chopped rosemary until well coated. Transfer the mixture into a baking dish, spreading it out evenly.
      5 large ripe peaches
    2. In a separate bowl, combine rolled oats, flour, brown sugar, and a pinch of salt. Use a pastry cutter or fork to cut in the cold butter until the mixture resembles coarse crumbs.
      5 large ripe peaches
    3. Sprinkle the crumble topping evenly over the peach filling, pressing it down gently to adhere slightly to the fruit.
      5 large ripe peaches
    4. Place the baking dish into the preheated oven and bake for about 40 minutes, or until the topping is golden brown and bubbling around the edges.
    5. Remove the crumble from the oven and let it cool slightly before serving. The topping will be crisp and caramelized, while the peaches remain tender and fragrant.

    This peach crumble is perfect for al fresco dinners or a cozy weekend treat. The combination of juicy fruit and crunchy topping offers comfort and excitement in every spoonful. Plus, it’s simple enough to whip up on a busy weeknight but impressive enough to serve to guests.

    As the season winds down, this recipe becomes a sweet farewell to summer’s bounty, leaving behind only memories of sunny orchards and fragrant gardens. The next time you crave something sweet, remember that a little twist makes all the difference. That unexpected burst of flavor is what makes baking endlessly rewarding.

  • Spooky Fun! Perfectly Creepy Halloween Mummy Pizza

    Spooky Fun! Perfectly Creepy Halloween Mummy Pizza

    Halloween is the perfect excuse to indulge in playful, spooky foods. But instead of boring pumpkin shapes, why not craft something with a little more chaos—like this Halloween Mummy Pizza? Its gooey cheese eyes and crispy, bandage-like pepperoni strips turn a simple pie into a whimsical monster, perfect for kids and adults alike.

    What makes this pizza stand out is the fun of decorating it. Creating the mummy’s wrappings with different toppings turns dinner into a delightful craft. Plus, it’s a feast for the senses—crunchy crust, savory cheese, and smoky pepperoni all in one spooky delight.

    Halloween Mummy Pizza

    This Halloween-themed pizza features a crispy crust topped with gooey cheese and decorated with pepperoni strips to resemble a spooky mummy. The cheese is melted and bubbly, with pepperoni arranged to look like bandages and eyes, creating a playful, spooky appearance.
    Prep Time 15 minutes
    Cook Time 15 minutes
    Total Time 30 minutes
    Servings: 4
    Course: Main Course
    Cuisine: American
    Calories: 280

    Ingredients
      

    • 1 blank store-bought pizza dough about 12 inches diameter
    • 1 cup cup shredded mozzarella cheese for topping
    • 50 grams pepperoni slices for bandages
    • 2 pieces white cheese or mozzarella balls for eyes
    • 2 pieces black olives for pupils
    • 1 tbsp olive oil to brush crust

    Equipment

    • Baking sheet
    • Parchment paper
    • Rolling pin
    • Oven
    • Kitchen scissors or knife

    Method
     

    1. Preheat your oven to 450°F (230°C) and line a baking sheet with parchment paper.
    2. Roll out the pizza dough into a 12-inch circle on a lightly floured surface, then transfer it to the prepared baking sheet.
    3. Brush the crust lightly with olive oil to promote browning and add a subtle shine.
      1 blank store-bought pizza dough
    4. Sprinkle the shredded mozzarella evenly over the dough, leaving a small border at the edges for the crust.
      1 blank store-bought pizza dough
    5. Arrange the slices of pepperoni across the surface in irregular, bandage-like strips, covering most of the cheese area for a chaotic look.
      1 blank store-bought pizza dough
    6. Bake in the preheated oven until the crust is golden and cheese is bubbling, about 12-15 minutes.
    7. While the pizza bakes, cut the mozzarella cheese into small round balls to create eyes, and slice black olives for pupils.
      1 blank store-bought pizza dough
    8. Once baked, remove the pizza from the oven and let it cool for a minute.
    9. Place the cheese eyes on the pizza, then use small slices of black olives to create pupils for a spooky effect.
      1 blank store-bought pizza dough
    10. Use kitchen scissors or a knife to carefully cut additional pepperoni slices into thin strips for extra bandages, and place them across the pizza as desired.
      1 blank store-bought pizza dough
    11. Serve your Halloween Mummy Pizza hot, with the eyes and bandages creating a fun, spooky presentation.

    This Halloween, transform your dining table into a spooky scene with these irresistibly fun mummy pizzas. They’re easy to assemble, packed with flavor, and guaranteed to spark smiles (and maybe a few giggles). Plus, once you get the hang of it, this recipe is a wonderful way to involve everyone in the kitchen chaos.

    Enjoy the thrill of a culinary costume that’s as tasty as it is charming. Whether it’s a party centerpiece or a surprise snack, these pizzas bring just the right amount of creepy comfort to the season. Happy haunting and eating!

  • Cool Blue: The Surprising Freshness of a Blueberry Slushie

    Cool Blue: The Surprising Freshness of a Blueberry Slushie

    Imagine someone squeezing the last jewel-toned berries of summer right into your glass. That burst of fresh blueberry aroma instantly transports you to a sun-drenched farmstead, where the air smells of ripe fruit and wildflowers. Making a blueberry slushie is more than blending berries; it’s about capturing that fleeting moment of peak berry freshness, frozen in time.

    This recipe is perfect when you want a quick, orchard-fresh treat that rivals the coolest ice creams but requires zero churn or complicated equipment. It’s a playful way to celebrate blueberry season, even on the chilliest days, by bringing a splash of summer joy into your glass. Plus, it’s just the right shade of pretty to make your kitchen feel like a botanical garden.

    WHY I LOVE THIS RECIPE?

    • Pure joy in every icy sip, tasting the natural sweetness of fresh blueberries.
    • Relishes the chaos of improvising with pantry staples — no fuss, just fun.
    • Brings back childhood memories of berry picking and summer picnics.
    • I love how vibrant and Instagram-worthy this icy treat looks with its deep purple hue.
    • The quick blending process makes it perfect for a spontaneous burst of refreshment.

    AVOID MY DISASTER (You’re Welcome)

    • FORGOT to add enough ice and ended up with berry juice. DUMPED more ice, quick blend—win!
    • OVERTHEARCHED the mixture, berries turned to mush—a quick rescue: add a splash of cold water and blend again.
    • DUMPED in too much sweetener—tasted flat. FIX: add a squeeze of lemon to brighten.
    • FORGOT to freeze the berries—lost their chill. REFREEZE berries overnight for a frosty punch the next day.

    QUICK FIXES THAT SAVE YOUR DAY

    • When the mixture is too thin, splash in more frozen berries and blend until thickened.
    • Never underestimate the power of adding a pinch of sea salt—it enhances berry flavor instantly.
    • If too sweet, patch with a dash of freshly squeezed lemon juice for zing.
    • Quickly shield the mixture with a handful of crushed ice if it melts too fast.
    • When berries aren’t icy enough, swap in frozen cherries or raspberries for a colorful twist and extra chill.

    This blueberry slushie is a simple, vibrant treat perfect for hot days, lazy weekends, or unexpected guests. Its refreshing chill makes it an ideal way to cool down without turning on the oven or preparing complicated desserts. It embodies the fleeting joy of peak summer, captured in a glass.

    In a season where berries are bursting with flavor, this quick slushie is a reminder that simple ingredients can give you a moment of pure refreshment. Whether you’re craving a midday boost or a playful dessert, this recipe offers a quick escape into fresh, fruity bliss.

    Blueberry Slushie

    This blueberry slushie is a frozen beverage made by blending fresh or frozen blueberries with ice and sweeteners. The mixture results in a vibrant, icy drink with a smooth, crushed-ice texture and a deep purple hue, perfect for hot days or refreshing snacks.
    Prep Time 5 minutes
    Total Time 5 minutes
    Servings: 2
    Course: Main Course
    Cuisine: American
    Calories: 120

    Ingredients
      

    • 2 cups frozen blueberries preferably frozen for best chill
    • 1 cup ice cubes more if needed for desired thickness
    • 2 tablespoons honey adjust to taste
    • 1 squeeze lemon juice brightens flavors

    Equipment

    • Blender
    • Measuring cups and spoons

    Method
     

    1. Add the frozen blueberries, ice cubes, honey, and lemon juice into the blender.
    2. Secure the lid on the blender and pulse a few times to start breaking down the berries and ice.
    3. Blend on high until the mixture is smooth, thick, and icy, with a vibrant purple color and no large ice chunks remaining.
    4. Pause and check the consistency—if it’s too thick, add a splash of water or juice and blend briefly to loosen it.
    5. Pour the slushie into glasses, capturing its icy, refreshing texture and deep purple hue.
    6. Garnish with fresh berries or a sprig of mint if desired, then serve immediately with a straw or spoon.

    Notes

    Adjust sweetness and tartness by varying honey and lemon juice. For a super chilled treat, freeze the berries overnight before blending.

    As the summer days stretch on, this blueberry slushie stands out as a go-to cool-down. Its blend of vibrant color and taste lends itself well to spontaneous gatherings or solo moments of treat-yourself indulgence. Plus, it’s easy to tailor with other frozen berries or a hint of mint for added flair.

    Every sip captures a tiny slice of summer’s peak harvest, reminding us of breezy afternoons and berry-stained fingers. No matter the season, this frozen delight will always have that refreshing charm. It’s a little reminder that simple, homemade treats can brighten even the gloomiest days.