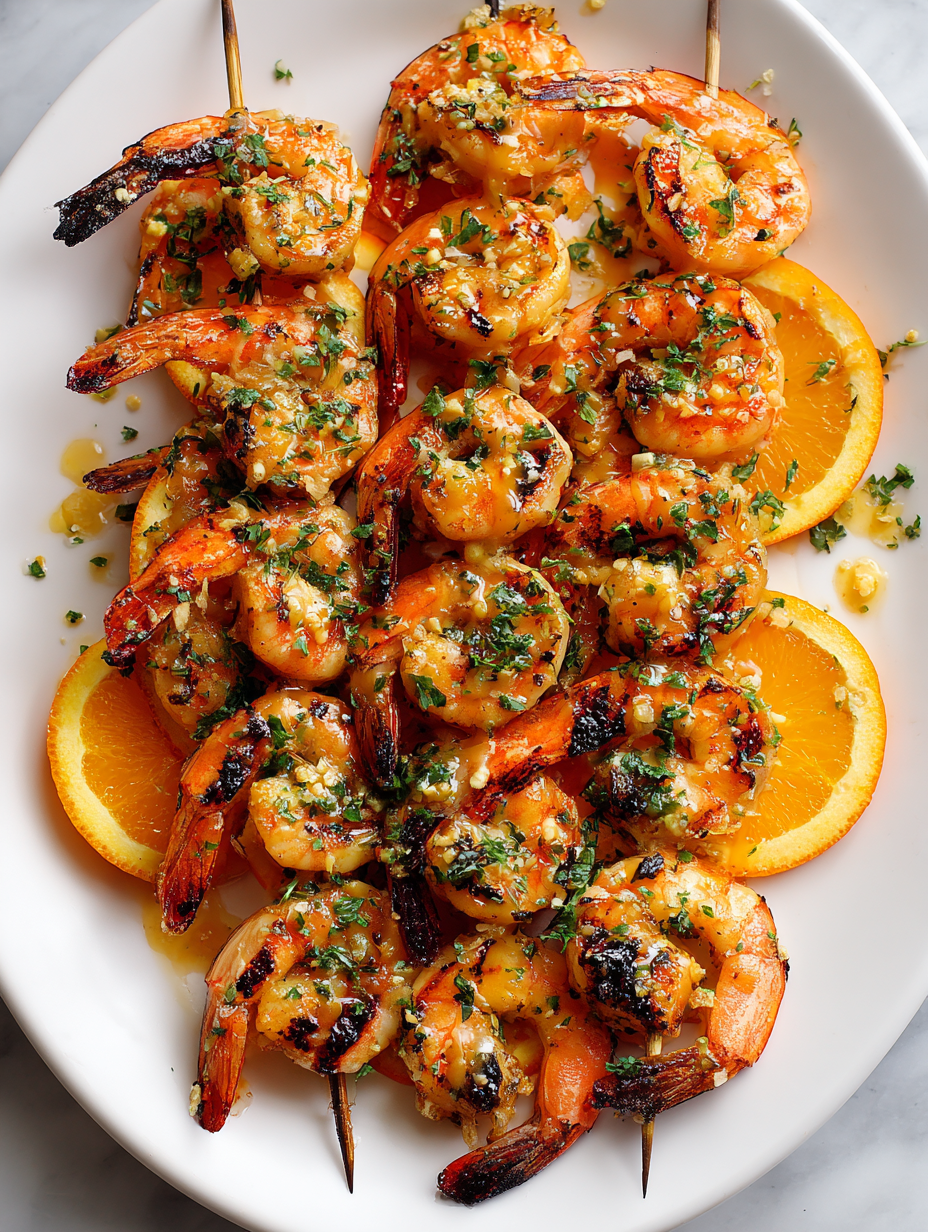
Author: EllaDavis

  • Pumpkin Oatmeal: The Cozy Morning Revival

    Pumpkin Oatmeal: The Cozy Morning Revival

    Every autumn, I find myself craving comfort that’s a bit more inventive than the usual pie or latte. This pumpkin oatmeal offers an unexpected twist that transforms a simple breakfast into a celebration of fall’s flavors. The warm aroma of pumpkin and cinnamon filling the kitchen makes it irresistible, especially on chilly mornings.

    What makes this recipe special is how it balances nutrition with soul-satisfying taste. I love that it’s versatile enough to customize with different toppings, yet simple enough to whip up in less than 15 minutes. It’s the perfect way to start a day full of crisp air and fallen leaves.

    Pumpkin Cinnamon Oatmeal

    This pumpkin cinnamon oatmeal is a hearty breakfast dish made by simmering rolled oats with pumpkin puree, milk, and warm spices until thickened. The final result is a creamy, orange-hued porridge with a smooth texture and cozy aroma, topped with optional nuts or seeds for added crunch.
    Prep Time 5 minutes
    Cook Time 10 minutes
    Total Time 15 minutes
    Servings: 2
    Course: Main Course
    Cuisine: Comfort Food
    Calories: 250

    Ingredients
      

    • 1 cup rolled oats old-fashioned
    • 2 cups milk dairy or plant-based
    • ½ cup pumpkin puree unsweetened
    • 1 teaspoon ground cinnamon
    • ¼ teaspoon ground nutmeg
    • 2 tablespoons maple syrup optional sweetener
    • ¼ teaspoon salt
    • optional toppings nuts, seeds, or extra cinnamon

    Equipment

    • Saucepan
    • Wooden Spoon

    Method
     

    1. Pour the milk into a saucepan and bring it to a gentle simmer over medium heat, listening for a soft bubbling sound.
    2. Stir in the rolled oats, ensuring they are evenly coated by the milk, and reduce the heat to maintain a gentle simmer.
    3. Add the pumpkin puree, ground cinnamon, nutmeg, salt, and maple syrup to the oats, stirring steadily to combine everything into a vibrant orange mixture.
    4. Continue cooking, stirring frequently, until the oats have absorbed most of the liquid and the mixture thickens to a creamy consistency, about 7-10 minutes.
    5. Remove the saucepan from the heat, and let the oatmeal sit for a minute or two to settle and become even creamier.
    6. Spoon the warm, pumpkin-spiced oatmeal into bowls, and sprinkle with your favorite toppings such as nuts or seeds, or an extra dash of cinnamon for presentation and texture.

    As the season shifts and mornings grow cooler, this pumpkin oatmeal becomes your cozy companion. It’s a bowl that promises a comforting escape wrapped in wholesome ingredients. Plus, it’s easy enough that even hectic mornings won’t hold you back from enjoying it.

    In these fleeting fall days, a bowl like this keeps the season alive from first sip to last spoonful. It’s the kind of recipe that makes every morning feel like a gentle ritual, one that warms both body and spirit, long after the last bites.

  • Spiced Pumpkin Cookies: A Cozy Fall Treasure

    Spiced Pumpkin Cookies: A Cozy Fall Treasure

    As autumn leaves crunch underfoot, the aroma of baked pumpkin cookies wafts through the air, stirring nostalgia and anticipation. These cookies aren’t just sweet treats; they’re a symphony of spices and memories, perfect for chilly mornings or festive gatherings.

    What makes this recipe truly special is its subtle twist on classic pumpkin cookies—think a hint of cardamom mingling with cinnamon, giving each bite a fragrant surprise. The dough is surprisingly forgiving, making it an ideal project for cozy weekends spent kneading and shaping. Once baked, their tender texture and flavorful warmth linger long after the oven cools.

    Let’s dive into the comforting world of pumpkin-spiced goodness, where every bite feels like a warm hug from fall itself. These cookies are simple to make but feel like a special occasion, especially when paired with a cup of cinnamon-spiced chai or a splash of vanilla milk.

    Pumpkin-Spiced Cookies

    These pumpkin-spiced cookies are tender and melt-in-your-mouth, made by mixing pumpkin puree into a spiced dough and baking until golden. They feature a soft texture with a slight chewiness and a fragrant aroma of cinnamon and cardamom, resulting in visually appealing, golden-brown cookies with a cracked surface.
    Prep Time 20 minutes
    Cook Time 12 minutes
    Total Time 32 minutes
    Servings: 12
    Course: Main Course
    Cuisine: American
    Calories: 150

    Ingredients
      

    • 1 1/2 cups all-purpose flour sifted
    • 1 cup pumpkin puree
    • 1/2 cup brown sugar packed
    • 1/4 cup granulated sugar
    • 1/2 cup unsalted butter softened
    • 1 large egg
    • 1 1/2 teaspoons ground cinnamon
    • 1/2 teaspoon ground cardamom for fragrant flavor
    • 1/2 teaspoon baking powder
    • 1/4 teaspoon salt

    Equipment

    • Mixing bowls
    • Baking sheet
    • Parchment paper
    • Whisk
    • Spatula
    • Cooling rack

    Method
     

    1. Preheat your oven to 350°F (175°C) and line a baking sheet with parchment paper.
    2. In a large mixing bowl, whisk together the softened butter, brown sugar, and granulated sugar until the mixture is smooth and creamy, with a slight gloss.
    3. Add the egg and vanilla extract to the creamed mixture and whisk until fully incorporated, resulting in a fluffy, homogeneous base.
    4. Mix in the pumpkin puree until the batter is smooth and evenly colored, giving a vibrant orange hue that hints at fall flavors.
    5. In a separate bowl, combine the sifted flour, cinnamon, cardamom, baking powder, and salt. Whisk to evenly distribute the spices and leavening agents.
    6. Gradually fold the dry ingredients into the wet mixture using a spatula, mixing just until combined and the dough comes together softly.
    7. Using a cookie scoop or spoon, portion out the dough onto the prepared baking sheet, spacing each cookie about 2 inches apart to allow for spreading.
    8. Bake in the oven for about 12 minutes, or until the edges are lightly golden and the centers look set but still soft.
    9. Remove the baking sheet from the oven and let the cookies cool on the sheet for 5 minutes to firm up before transferring them to a cooling rack.
    10. Place the cookies on a wire rack and allow them to cool completely, revealing their cracked, rustic surface and tender texture.
    11. Once cooled, serve your pumpkin-spiced cookies alongside a warm beverage for a cozy treat.

    These pumpkin cookies are a reminder that seasonal ingredients can transform simple baked goods into heartfelt treats. They’re perfect for unexpected guests or those quiet moments of indulgence when you want a little warmth in every bite.

    Enjoy the comforting aroma filling your kitchen and cherish these small pieces of autumn. Sometimes, it’s the simplest recipes that leave the sweetest memories to savor long after the last crumb disappears.

  • Spooky Sweet & Savory: Halloween Bat Wings with Soy Sauce Glaze

    Spooky Sweet & Savory: Halloween Bat Wings with Soy Sauce Glaze

    As October nights grow darker, I find myself craving more than just the usual pumpkin-flavored treats. I love turning the familiar chicken wing into something whimsical and eerie—like these Halloween Bat Wings. The glossy soy sauce glaze mimics the midnight sheen of bat wings fluttering through a moonlit sky.

    This recipe is my autumn ritual, a way to bring a bit of spooky fun to the dinner table while satisfying that salty-sweet craving that only soy sauce can fulfill. The aroma alone, a smoky, salty scent with hints of caramelized sugar, transports me right into a cozy, haunted harvest festival.

    Halloween Bat Wings

    These chicken wings are glazed with a glossy soy sauce marinade that creates a shiny, dark coating reminiscent of bat wings in flight. The wings are baked until crispy, resulting in a savory, slightly caramelized exterior with tender meat inside. Their spooky, glossy appearance makes them perfect for festive Halloween gatherings.
    Prep Time 15 minutes
    Cook Time 40 minutes
    Total Time 55 minutes
    Servings: 4
    Course: Main Course
    Cuisine: American
    Calories: 290

    Ingredients
      

    • 2 lbs chicken wings tip: drumettes and flats
    • 1/4 cup soy sauce preferably dark for color
    • 2 tablespoons honey for caramelization
    • 1 teaspoon garlic powder
    • 1 teaspoon ground ginger
    • 1/4 teaspoon black pepper
    • 1 tablespoon cooking oil for mixing glaze

    Equipment

    • Baking sheet
    • Wire rack
    • Kitchen brush

    Method
     

    1. Preheat your oven to 400°F (200°C) and line a baking sheet with foil. Place a wire rack on top to allow air circulation around the wings for even crisping.
    2. Pat the chicken wings dry with paper towels and place them in a large bowl. This helps the glaze adhere better and promotes crispiness during baking.
    3. In a small bowl, whisk together soy sauce, honey, garlic powder, ground ginger, black pepper, and cooking oil to create a smooth, dark marinade that will give the wings their signature glossy finish.
    4. Pour the glaze over the chicken wings, tossing well to coat each piece evenly. Let them marinate for at least 10 minutes to absorb the flavors.
    5. Arrange the coated wings on the wire rack, spacing them out to avoid overcrowding. This allows hot air to circulate, making the wings crispy all around.
    6. Bake the wings in the preheated oven for 35-40 minutes, turning once halfway through. You’ll notice the glaze bubbling and the wings turning a deep, caramelized brown.
    7. Once baked, remove the wings from the oven and brush them with a little extra glaze if desired for a shiny, spooky finish. Let them rest for a few minutes to set the glaze and crisp up further.
    8. Serve the Halloween Bat Wings hot, with their glossy, dark exterior resembling fluttering bat wings illuminated under moonlight.

    Notes

    You can add black sesame seeds or edible glitter for extra spooky effect before serving.
    These Halloween Bat Wings are more than just a festive appetizer—they’re a reminder of how playful cooking can be. The combination of crispy skin and tender meat coated in a savory soy glaze makes them irresistibly addictive.

    As the season deepens, I love sharing these quirky wings with friends, watching their eyes light up with surprise. It’s a small gesture, but in the chaos of fall, these bat-shaped delights bring a little magic and a lot of flavor to the plate.

  • The Secret Chill: Uncovering the Magic of Kool Aid Slushies in Every Drop

    The Secret Chill: Uncovering the Magic of Kool Aid Slushies in Every Drop

    Ever wonder how a simple summer treat can stir up childhood memories while satisfying your grown-up palate? Enter the Kool Aid slushie—a vibrant, icy blast of nostalgia with an unexpected twist. This recipe isn’t just about cool sweetness; it’s about unlocking a burst of flavor that sparks joy, chaos, and a sprinkle of childhood mischief.

    Imagine pouring the sweet, fragrant powder into icy water, then watching it transform into a shimmering, frost-coated delight. For those sweltering days or spontaneous gatherings, this slushie becomes your best friend—bright, refreshing, and utterly craveable. Plus, it’s remarkably forgiving, perfect for any level of kitchen chaos.

    Kool Aid Slushie

    A Kool Aid slushie is a colorful, icy frozen beverage made by dissolving flavored powder into water and freezing it to achieve a crisp, semi-frozen texture. It features a vibrant appearance with a punch of sweet, fruity flavor and a refreshing chill, perfect for hot days or nostalgic treats.
    Prep Time 10 minutes
    Total Time 10 minutes
    Servings: 4
    Course: Main Course
    Cuisine: American
    Calories: 120

    Ingredients
      

    • 1 cup hot water for dissolving the Kool Aid powder
    • 1/2 cup granulated sugar optional, for added sweetness
    • 1 packet Kool Aid powder choose your favorite flavor
    • 2 cups cold water for diluting and freezing

    Equipment

    • Measuring cups and spoons
    • Mixing bowl
    • Whisk or spoon
    • Freezer-safe container or baking dish
    • Fork or spoon for scraping

    Method
     

    1. Measure out hot water and pour it into a mixing bowl. Add the Kool Aid powder and sugar, then whisk vigorously until the powder and sugar are fully dissolved, creating a bright, fragrant syrup.
    2. Pour in cold water and stir well to combine, ensuring the mixture is evenly colored and clear.
    3. Pour the mixture into a freezer-safe container or baking dish and spread it out evenly with a spatula or spoon. Cover it tightly with a lid or plastic wrap.
    4. Place the container in the freezer and let it freeze for about 4 hours, or until the edges are starting to firm up and small ice crystals form around the sides.
    5. Remove the container from the freezer and scrape the partially frozen mixture with a fork, breaking up any large ice chunks to promote even freezing.
    6. Return the container to the freezer and repeat the scraping process every 30 minutes for another 2-3 hours, until the slushie reaches a smooth, scoopable consistency with fine ice crystals.
    7. Once the mixture is evenly frozen and fluffy, scoop it into glasses or cups, and serve immediately for a chilly, colorful treat.

    Notes

    For more intense flavor, increase the Kool Aid powder amount or add fresh fruit for garnish.

    Now that you’ve mastered this Kool Aid slushie, it’s your turn to inject a splash of fun into your summer moments. Whether you’re recreating childhood or just chasing the thrill of icy, sweet relief, this recipe fits right in. Remember, the best part is how flexible and forgiving it is—no two slushies will be exactly the same, and that’s the charm.

    So, keep your freezer stocked with your favorite flavors and let the chaos of creation lead the way. In a world that often rushes by, take a moment to savor the simple joy of a brilliant, icy treat. Cheers to more sweet, frosty adventures!

    }

  • Harvest Season Harmony: One-Pan Fall Chicken Dinner

    Harvest Season Harmony: One-Pan Fall Chicken Dinner

    As the leaves crunch underfoot and the air turns crisp, I find myself craving comfort that reflects the season. This one-pan fall chicken dinner is my go-to dish when I want something hearty yet surprisingly simple. It captures the essence of autumn with tender chicken, sweet-rooted vegetables, and a whisper of sage, all cooked together to meld flavors effortlessly.

    What makes this recipe stand out is its versatility. It works perfectly on busy weeknights and sets a festive tone for weekend gatherings. Plus, it eliminates the usual mess—just one pan, fewer dishes, more time to enjoy the season’s bounty.

    One-Pan Fall Chicken Dinner

    This dish features tender chicken pieces cooked with sweet-rooted vegetables and fresh sage in a single skillet. The ingredients meld together as they cook, resulting in a hearty meal with a comforting, rustic appearance and a savory aroma. The final dish is golden-brown on top, with vegetables softened and chicken juicy and flavorful.
    Prep Time 15 minutes
    Cook Time 40 minutes
    Total Time 55 minutes
    Servings: 4
    Course: Main Course
    Cuisine: American
    Calories: 450

    Ingredients
      

    • 4 pieces bone-in skin-on chicken thighs or breasts if preferred
    • 2 medium sweet potatoes peeled and cut into chunks
    • 2 medium carrots peeled and sliced
    • 1 small onion sliced
    • 2 cloves garlic minced
    • 2 teaspoons fresh sage chopped
    • 2 tablespoons olive oil
    • 1 teaspoon salt
    • ½ teaspoon black pepper

    Equipment

    • Large skillet or oven-proof frying pan
    • Tongs or spatula

    Method
     

    1. Preheat your oven to 400°F (200°C). Pat the chicken thighs dry with paper towels and season them generously with salt and black pepper.
    2. Heat olive oil in a large oven-proof skillet over medium-high heat until shimmering. Place the chicken thighs skin-side down and cook for about 5-7 minutes until the skin turns golden brown and crispy. Flip and cook another 3-4 minutes on the other side.
    3. Add sliced onions around the chicken in the skillet, stirring gently to coat with the oil, and cook for 2-3 minutes until translucent and fragrant.
    4. Stir in the minced garlic and chopped sage, cooking for about 30 seconds until aromatic.
    5. Add the sweet potato chunks and sliced carrots into the skillet, stirring to combine and coat with the flavorful juices.
    6. Transfer the entire skillet to the preheated oven and roast uncovered for 25-30 minutes, or until the chicken skin is crisp and the vegetables are tender.
    7. Once cooked, remove the skillet from the oven and let it rest for 5 minutes. Check that the chicken is cooked through and juices run clear.
    8. Serve the fall chicken with the roasted vegetables on a large platter or plates, spooning the flavorful pan juices over the top for added richness.
    This dish is a reminder that good food doesn’t need to be complicated, especially when seasons change. The warm aromas of roasted garlic and cinnamon can make any space feel cozy, no matter the weather outside. So, gather your ingredients, embrace the chaos of cooking, and let this meal carry you into autumn’s embrace with ease and flavor.

  • Unconventional Cozy Twist: Taco Soup That’s Surprisingly Heartwarming

    Unconventional Cozy Twist: Taco Soup That’s Surprisingly Heartwarming

    Imagine a bowl of taco soup that combines a nostalgic roadside stand aroma with an unexpected depth of flavor. This recipe transforms common ingredients into a comforting meal that warms you from the inside out, perfect for those chilly evenings. The secret lies in a unique spice blend that elevates the usual taco fare into something truly memorable.

    Baking hours of busy weekdays into a single-pot masterpiece is a relief. This taco soup recipe is about embracing chaos in the kitchen with a smile, knowing that every spoonful is packed with personality. It’s not just a meal but a cozy throwback to simpler times, reimagined with a surprising flair.

    Taco Soup

    Taco soup is a hearty, flavorful dish made by simmering ground meat, beans, corn, and tomatoes with a blend of spices. It results in a thick, comforting soup with a slightly spicy and savory profile, topped with cheese, sour cream, or fresh herbs for added flavor.
    Prep Time 15 minutes
    Cook Time 30 minutes
    Total Time 45 minutes
    Servings: 6
    Course: Main Course
    Cuisine: Mexican
    Calories: 300

    Ingredients
      

    • 1 pound ground beef or ground turkey
    • 1 can diced tomatoes 14.5 oz can
    • 1 can black beans drained and rinsed, 15 oz can
    • 1 can corn kernels 14 oz can, drained
    • 1 cup chicken broth
    • 1 package taco seasoning 1 oz packet
    • 1 small onion finely chopped
    • 2 cloves garlic minced
    • to taste salt and pepper

    Equipment

    • Large pot or Dutch oven
    • Wooden spoon or spatula

    Method
     

    1. Heat a large pot over medium heat and add the ground meat, breaking it apart as it cooks until browned and cooked through, about 5-7 minutes.
    2. Add the chopped onion and minced garlic to the pot with the meat and cook until the onion becomes translucent and fragrant, about 3 minutes.
    3. Stir in the taco seasoning until the meat and onions are evenly coated, allowing the spices to toast slightly and release their aroma.
    4. Pour in the diced tomatoes, black beans, corn, and chicken broth, stirring everything together to combine well.
    5. Bring the mixture to a boil, then reduce the heat to low and let it simmer uncovered for about 20 minutes, allowing the flavors to meld and the soup to thicken slightly.
    6. Taste the soup and season with salt and pepper as needed, adjusting the seasoning to your preference.
    7. Serve the hot taco soup in bowls, garnished with your favorite toppings such as shredded cheese, sour cream, chopped cilantro, or sliced jalapeños.
    This taco soup has become a favorite among friends for its ability to bring comfort with a little unexpected twist. It’s perfect for casual family nights or when you want a taste of home that’s both easy and a bit daring.

    As winter’s chill settles in, a hot bowl of this soup feels like a warm embrace. Its complex aroma and hearty texture make it a brilliant choice for turning a busy day into a moment of pure satisfaction. Sometimes, the simplest dishes make the deepest memories.

  • The Secret to a Refreshing Summer Strawberry Slushie

    The Secret to a Refreshing Summer Strawberry Slushie

    Every once in a while, I stumble upon a flavor combination that sparks a childhood memory and adds a zing to my summer days. The strawberry slushie is one of those little joys, blending ripe berries with just enough ice to create a chilly burst of sweetness. It’s perfect for those hot afternoons when hydration and flavor collide.

    But this isn’t just any strawberry slushie. I like to think of it as a science experiment with a splash of nostalgia—a recipe that’s flexible, forgiving, and surprisingly moreish. It’s ideal for spontaneous gatherings or a quick treat after a long day of yard work, summoning the smell of fresh strawberries and the crackle of icy crunch in every sip.

    Strawberry Slushie

    A strawberry slushie is a frozen beverage that blends ripe strawberries with crushed ice to create a refreshing, icy texture. The mixture results in a bright pink, slushy drink with a sweet and slightly tart flavor, perfect for hot summer days.
    Prep Time 10 minutes
    Total Time 10 minutes
    Servings: 2
    Course: Main Course
    Cuisine: American
    Calories: 70

    Ingredients
      

    • 2 cups fresh strawberries hulled and rinsed
    • 1 cup ice cubes preferably crushed or small-sized
    • 1 tablespoon honey or agave syrup optional for added sweetness

    Equipment

    • Blender
    • Measuring cups

    Method
     

    1. Place the fresh strawberries into the blender.
    2. Add the ice cubes on top of the strawberries.
    3. Drizzle in honey or agave syrup if you prefer extra sweetness.
    4. Secure the lid on the blender and blend on high until the mixture is smooth and slushy, about 30-45 seconds.
    5. Stop the blender and check the texture—if it’s too thick, add a splash of cold water or more strawberries and blend briefly again.
    6. Pour the strawberry slushie into glasses, revealing a vibrant pink, icy beverage.
    7. Serve immediately with a straw or garnish with a fresh strawberry for a perfect summer treat.

    Notes

    For an extra flavor twist, add a squeeze of lemon juice or a handful of mint leaves before blending.

    This strawberry slushie is more than just a beverage; it’s a little pocket of cool happiness that fits perfectly into the summer rhythm. The bright scent of strawberries and the crunch of ice seem to slow down time, even amidst a busy day. It’s all about savoring simple joys before the heat makes everything else seem overwhelming.

    As the season deepens, these slushies become a nostalgic reminder of childhood summers, yet evolve into a versatile treat suitable for all ages. No matter how many times I make it, the recipe feels fresh and rewarding, a tiny rebellion against the sweltering heat. Sometimes, keeping it simple is just the best way to beat the season’s relentless pace.

  • Spooky Delight: Halloween Monster Eyeball Cake Pops

    Spooky Delight: Halloween Monster Eyeball Cake Pops

    Every October, I find myself craving projects that blend chaos and cuteness. These Halloween Monster Eyeball Cake Pops do just that, with their quirky, bloodshot eyes and squishy texture. They remind me of childhood monster stories that still make me peek around corners.

    Crafting them feels like a tiny part of a haunted house. The squeals of delight from friends and family come with every eye you pop onto a stick. These treats turn a simple party into a full-blown Halloween spectacle, blending horror with humor in each bite.

    WHY I LOVE THIS RECIPE?

    • Pure chaos, straight from my kitchen, turned into adorable monster eyes.
    • Joyful moments when friends guess the hidden flavors—chocolate, cherry, and a touch of chaos.
    • Relief that these pops are surprisingly easy, so I can focus on costumes, not cleanup.
    • Feeling nostalgic for childhood monsters and candy adventures.
    • The pride of creating something spooky yet edible with my own two hands.

    AVOID MY DISASTER (You’re Welcome)

    • FORGOT to chill the cake ball mixture—the eyes fell apart; refrigerate forthwith.
    • DUMPED melted chocolate on the vacuumed table—used parchment to save it.
    • OVER-TORCHED the candy eyes; bell pepper sponge helps fix the cracked openings.
    • FORGOT to secure the eyeball with enough icing; double-dip for sturdiness.

    QUICK FIXES THAT SAVE YOUR DAY

    • When eyes crack, splash a little edible glue and press gently—shimmer restored.
    • If icing is too thick, thin it with a tiny drop of milk for perfect spreading.
    • When chocolate won’t set, chill for five minutes in the fridge—crackle less.
    • Shield cracked eyes with a thin layer of white chocolate—saves the look.
    • If you’re out of food coloring, use a pinch of freeze-dried powder for vibrant hues.

    These Monster Eyeball Cake Pops are a treat that captures the playful spirit of Halloween. Their slightly creepy yet charming appearance makes them perfect for parties or a fun kids’ baking day. The festive season gets even more delicious with a batch of these peculiar, colorful candies.

    In the end, it’s about embracing messy creativity and sharing a laugh with loved ones. No matter what goes wrong in the kitchen, the joy of making spooky sweets is what keeps the season alive. So, gather your ingredients and get ready for some friendly monster mischief.

    Halloween Monster Eyeball Cake Pops

    These cake pops are made by combining crumbled cake with frosting to form a dough, which is then shaped into small balls. They are coated in melted chocolate and decorated to resemble creepy eyeballs with bloodshot, textured appearances. The final treat has a chewy, moist interior with a glossy, detailed exterior that mimics realistic eyeballs.
    Prep Time 30 minutes
    Cook Time 10 minutes
    Total Time 40 minutes
    Servings: 10
    Course: Main Course
    Cuisine: Halloween
    Calories: 150

    Ingredients
      

    • 2 cups crumbled cake (e.g., chocolate or vanilla) cooled and crumbled into fine pieces
    • 0.5 cup buttercream frosting to bind the cake crumbles
    • 16 oz melted chocolate (dark or white) for coating the cake balls
    • 10 pieces lollipop sticks
    • 1 cup red-colored candy melted or colored white chocolate for bloodshot effect
    • optional food coloring or powdered freeze-dried icing color to dye the chocolate or candy

    Equipment

    • Mixing bowls
    • Chocolate melting tools
    • Lollipop sticks
    • Baking sheet
    • Cooling rack
    • Small piping bags or brushes

    Method
     

    1. Mix the crumbled cake with the buttercream frosting until well combined and crumbly but able to hold together when shaped.
    2. Roll the mixture into small, even-sized balls about the size of a golf ball and place them on a baking sheet lined with parchment paper.
    3. Insert a lollipop stick into each cake ball, pushing about halfway in, and chill in the refrigerator for at least 30 minutes to firm up.
    4. Place the chilled cake pops in a holder or stand and dip each into the melted chocolate, tapping off excess to create a smooth, shiny coating.
    5. Set the coated cake pops on a cooling rack and let the chocolate set completely, about 15-20 minutes.
    6. Use a piping bag or a small brush to add red-colored candy or melted red chocolate around the edges of the eyes for a bloodshot effect, and create bloodshot lines by piping thin red lines across the eyeballs.
    7. For the eyeballs’ detailed appearance, add small dots of contrasting colored chocolate or icing to simulate blood vessels and give the monster eye a creepy, textured look.
    8. Allow the decorated cake pops to set for an additional 10 minutes, ensuring all decorations are firm.
    9. Enjoy your spooky, creepy eyeball cake pops, perfect for Halloween parties or a fun baking activity with kids.

    As the lights dim and Halloween night falls, these eyeball cake pops bring a dash of whimsy to the spooky atmosphere. Each bite offers a surprising crunch and a sweet, slightly fruity flavor that’s irresistible. They’re not just treats; they’re conversation starters and memory makers.

    Remember, the chaos in the kitchen often leads to the most memorable creations. Let your imagination run wild and enjoy every moment of your Halloween baking adventure. After all, some of the best stories come from the funniest mistakes.

  • Hello world!

    Welcome to WordPress. This is your first post. Edit or delete it, then start writing!