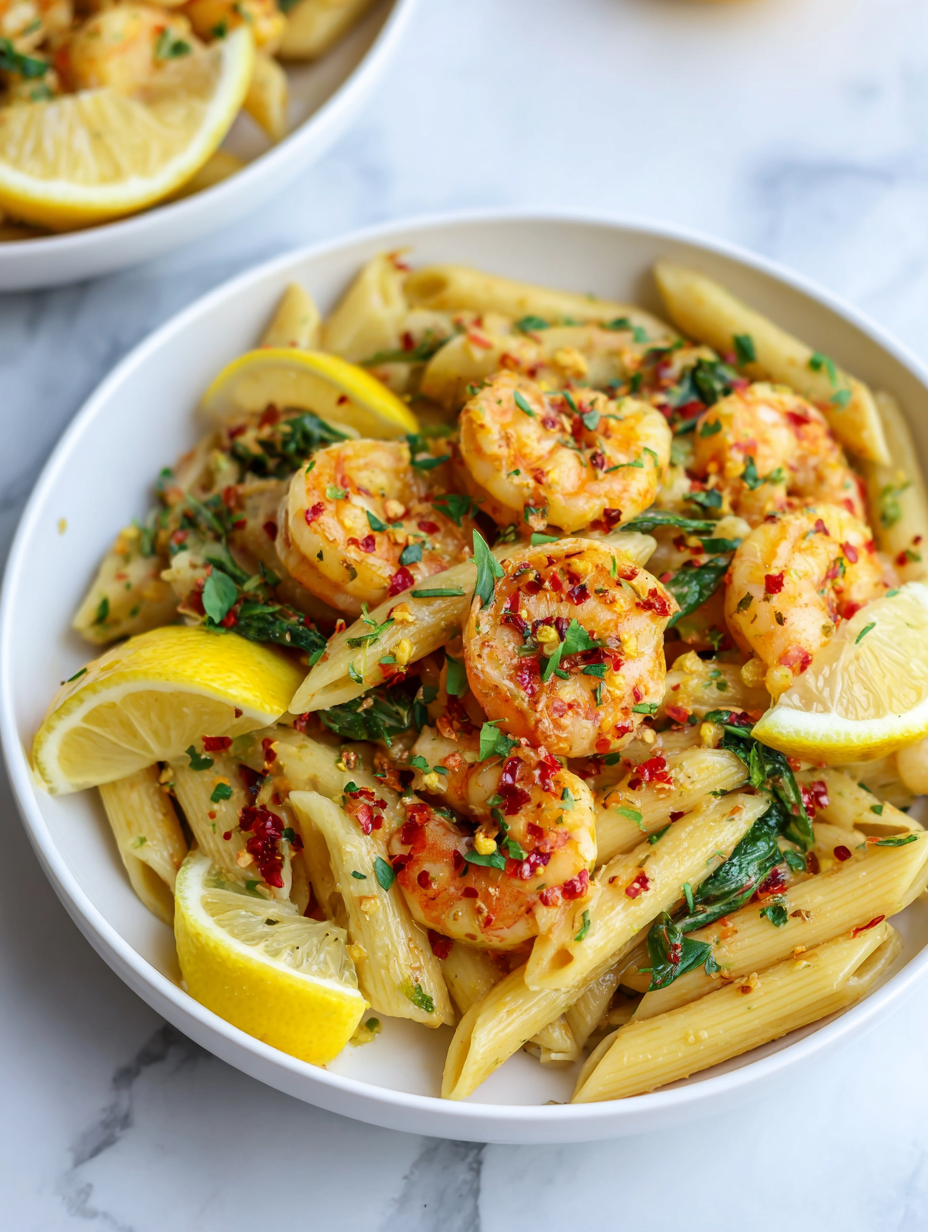
Author: EllaDavis

  • The Secret Chill of Caramel Slushie Wonders

    The Secret Chill of Caramel Slushie Wonders

    Imagine turning those lazy summer afternoons into a swirl of rich, caramel-infused cold bliss. Creating a caramel slushie is like capturing a fleeting caramel cloud down to its sweetest, most icy essence. It’s a sensory escape that balances the nostalgia of childhood treats with the sophistication of caramel’s smoky depth.

    What makes this recipe truly special isn’t just the sweet, velvety caramel; it’s how it transforms in your freezer and blends into that frosty, melt-on-your-tongue texture. The surprise? You can customize it with sea salt, whipped cream, or even a dash of bourbon for grown-up evenings. This isn’t just a drink—it’s an experience of chill and decadence wrapped in a glass.

    Caramel Slushie

    A caramel slushie is a frozen beverage made by blending caramel, milk, and ice to create a creamy, icy treat with a smooth, velvety texture. The mixture is frozen until firm and then blended to achieve a sorbet-like consistency, often topped with optional garnishes for added flavor and presentation.
    Prep Time 10 minutes
    Total Time 10 minutes
    Servings: 2
    Course: Main Course
    Cuisine: Dessert
    Calories: 210

    Ingredients
      

    • 1/2 cup granulated sugar for caramel
    • 1/4 cup water for caramel
    • 1 cup whole milk for richness
    • 1 cup heavy cream for creaminess
    • 2 cups ice cubes to frost and freeze
    • 1/2 teaspoon sea salt optional for saltiness

    Equipment

    • Blender
    • Freezer

    Method
     

    1. Combine sugar and water in a small saucepan over medium heat, stirring gently until the sugar dissolves. Continue cooking without stirring until the mixture turns a deep amber color and develops a caramel aroma, about 5-7 minutes. Carefully pour the hot caramel into a heatproof bowl and let it cool slightly.
    2. Add the milk and heavy cream to the slightly cooled caramel, whisking vigorously to combine and smooth out the caramel bits. Be cautious as the mixture will bubble vigorously—this is normal as the caramel dissolves fully into the dairy.
    3. Pour the caramel-milk mixture into a shallow dish or container and place it in the freezer. Let it freeze for about 2-3 hours, stirring every 30 minutes to break up ice crystals and promote a smooth, sorbet-like texture.
    4. Once the mixture is sufficiently frozen but still scoopable, add the ice cubes to your blender along with the semi-frozen caramel mixture. If using, sprinkle in the sea salt for a hint of saltiness that enhances the caramel flavor.
    5. Blend on high until the mixture becomes smooth, thick, and icy, resembling a soft-serve texture. You might need to stop and scrape down the sides occasionally to ensure everything blends evenly.
    6. Pour the blended caramel slushie into glasses, and optionally top with whipped cream, a drizzle of additional caramel, or a sprinkle of sea salt for garnish. Serve immediately for the best icy, decadent experience.

    Notes

    For a richer flavor, you can add a splash of bourbon or vanilla extract before blending. Ensure the caramel is cooled enough before mixing with dairy to prevent separation.

    Every spoonful of this caramel slushie reminds me of sunny days and cozy nights, all rolled into one cold, luscious gulp. It’s perfect for spontaneous get-togethers or just treating yourself after a long day. Once you taste that silky caramel awash in icy freshness, you’ll see why it’s worth a try any season.

    In a world rushing by, sometimes what we need most is the slow, sweet retreat of a homemade slushie. It’s a simple pleasure that brings about a pause, a happy moment wrapped in layers of caramel richness and frosty delight. Cheers to chilly indulgences that make even the hottest days feel a little cooler.

  • Chill Out with the Unexpected Coolness of a Chocolate Slushie

    Chill Out with the Unexpected Coolness of a Chocolate Slushie

    In the heart of summer, I stumbled upon a secret hidden in my freezer—the perfect way to beat the heat with a twist. This chocolate slushie isn’t your average icy treat; it’s infused with just enough richness to keep the dessert lovers happy and the heat at bay. Every sip cradles a cool rush and a whisper of cacao that instantly transports me to a breezy mountain cabin.

    What makes this recipe stand out is its simplicity and the unplanned nostalgia it stirs. It’s a throwback to childhood summer afternoons, but with a grown-up upgrade of deep, velvety chocolate. No fancy ingredients or long prep—just a blender and a handful of pantry staples, ready in minutes to make your day a little sweeter.

    Chocolate Frozen Slushie

    This chocolate frozen slushie is a chilled, icy beverage made by blending cocoa, milk, and sweetener until smooth and slushy. It has a velvety texture with a rich chocolate flavor, served as a refreshing treat during warm weather. The final appearance is a thick, icy mixture with a glossy, chocolatey look.
    Prep Time 5 minutes
    Total Time 5 minutes
    Servings: 2
    Course: Main Course
    Cuisine: American
    Calories: 180

    Ingredients
      

    • 2 cups milk preferably whole milk for creaminess
    • 1/4 cup unsweetened cocoa powder sifted for smooth blending
    • 1/4 cup granulated sugar adjust to taste
    • 1 teaspoon vanilla extract
    • 1 cup ice cubes preferably crushed or small-sized

    Equipment

    • Blender
    • Measuring cups and spoons

    Method
     

    1. Measure out the milk, sift the cocoa powder to remove lumps, and pour both into the blender.
    2. Add the granulated sugar and vanilla extract to the blender with the milk and cocoa.
    3. Blend the mixture on high for about 30 seconds until the cocoa and sugar dissolve completely and the mixture is smooth.
    4. Add ice cubes to the blender and blend again for another 15-20 seconds until the ice is fully crushed and the mixture becomes thick and slushy.
    5. Check the consistency; if it’s too thick, add a splash of milk and pulse briefly to loosen it slightly.
    6. Pour the chocolate slushie into glasses. The mixture should be thick, icy, and glossy with a deep chocolate hue.

    Notes

    For a creamier texture, substitute some milk with a splash of cream or add a dollop of whipped cream on top before serving.
    This chocolate slushie isn’t just a hot weather fix; it’s a moment of joy tucked into a glass. Whether you’re celebrating a small win or just looking for a quick escape from the chaos, it delivers a satisfying burst of cold, creamy, chocolate goodness.

    As the season shifts, this recipe offers a cool reminder of how simple pleasures can brighten even the busiest days. It’s perfect for lazy afternoons or impromptu gatherings, glowing with the promise of a soothing, chocolatey chill that keeps you coming back.

  • Hidden Sweetness in Every Bite: The Unexpected Charm of Stuffed Peppers

    Hidden Sweetness in Every Bite: The Unexpected Charm of Stuffed Peppers

    Imagine a dish that balances the comforting warmth of baked vegetables with a burst of unexpected sweetness. Stuffed peppers, usually seen as hearty or bland, can be transformed into a delightful adventure for your taste buds when you add a splash of balsamic glaze and a sprinkle of toasted pine nuts. Today, I want to share a version that celebrates this unlikely pairing, turning ordinary ingredients into extraordinary bites.

    This recipe encourages you to look beyond the standard filling and embrace a touch of chaos in your kitchen. Using colorful bell peppers and a surprising sweet-savory filling, it’s perfect for those seeking something fresh yet familiar. It’s a reminder that even the simplest ingredients have the potential for delightful surprises when combined thoughtfully.

    Sweet Balsamic Stuffed Peppers with Toasted Pine Nuts

    These baked stuffed peppers feature a colorful mix of sweet and savory ingredients, including a vibrant vegetable filling topped with balsamic glaze and toasted pine nuts. The dish is finished with a caramelized, slightly sticky exterior and a tender, flavorful interior. The presentation is bright and inviting, highlighting the contrasting textures and flavors.
    Prep Time 20 minutes
    Cook Time 35 minutes
    Total Time 55 minutes
    Servings: 4
    Course: Main Course
    Cuisine: Fusion
    Calories: 250

    Ingredients
      

    • 4 large bell peppers various colors for visual appeal
    • 1 cup quinoa or cooked rice for filling texture
    • 1/2 cup dried cranberries or raisins adds sweetness
    • 1 cup chopped fresh spinach for color and flavor
    • 2 cloves garlic minced
    • 2 tablespoons olive oil
    • 1/4 cup balsamic glaze for drizzling and glazing
    • 1/4 cup pine nuts toasted
    • Salt and pepper to taste

    Equipment

    • Baking dish or sheet
    • Chef’s knife
    • Cutting board
    • Mixing bowls
    • Sauté pan
    • Toaster or oven
    • Measuring spoons
    • Spatula

    Method
     

    1. Preheat your oven to 375°F (190°C). Slice the tops off the bell peppers and remove the seeds and membranes. Arrange them cut-side up in a baking dish. Lightly brush the outside of the peppers with a little olive oil.
    2. Cook the quinoa or rice according to package instructions, then let it cool slightly. In a large mixing bowl, combine the cooked grain with dried cranberries, chopped spinach, and minced garlic. Drizzle in a tablespoon of olive oil and season with salt and pepper, mixing well.
    3. Stuff each prepared bell pepper generously with the mixture, pressing down slightly to pack it in. Place the stuffed peppers in the baking dish, open side up.
    4. Bake the peppers in the preheated oven for about 25-30 minutes, until they are tender and slightly caramelized on the edges.
    5. While the peppers bake, toast the pine nuts in a dry skillet over medium heat until golden and fragrant, about 3-4 minutes. Watch carefully to prevent burning.
    6. Remove the peppers from the oven and drizzle each with balsamic glaze. Sprinkle the toasted pine nuts over the top for a crunchy finish.
    7. Return the peppers to the oven for an additional 5 minutes if you desire a slight caramelization and warmth for the glaze.
    8. Gently transfer the peppers to serving plates. Garnish with additional balsamic glaze or fresh herbs if desired. Serve warm and enjoy the burst of sweet, savory, and crunchy textures.

    As the peppers come out of the oven, their edges slightly caramelized and fragrant of garlic, they invite you to dig in. The contrast of crunchy tops with tender interiors makes each bite a celebration of textures. Sometimes, it’s these little twists that rekindle your love for everyday cooking, reminding you how fun and creative it can be.

    This dish is especially relevant now, with a focus on seasonal produce and flavor exploration. It’s a simple yet impactful way to bring a burst of color and flavor to your table without much fuss. Enjoy the process of balancing sweet, savory, and smoky notes—each pepper a little vessel of happiness.

  • Chill Out with an Oreo Slushie: The Unexpected Cold Crush

    Chill Out with an Oreo Slushie: The Unexpected Cold Crush

    Imagine sinking into a plush outdoor chair as the late afternoon sun hits just right. Before you, a frosty Oreo slushie shimmers with tiny cookie bits, promising a burst of sweet, chocolaty refreshment. This isn’t just a treat; it’s a nostalgic escape dressed in icy layers.

    Crafting this slushie transforms a simple pantry stash into a celebratory moment. The rich aroma of crushed Oreos mingles with the cool, creamy base, awakening childhood memories of cookie jars and sunny afternoons. It’s surprisingly quick to whip up, making it perfect for impromptu gatherings or solo chill sessions.

    ## WHY I LOVE THIS RECIPE?
    – It’s like a chocolatey hug in a glass, satisfying my sweet tooth with each sip.
    – Perfectly customizable: add extra cookies or a splash of milk for different textures.
    – Brings a playful touch to any summer day, blending nostalgia with instant cool.
    – The crunch of Oreo chunks contrasts beautifully with the smooth icy base, delighting every bite.

    Oreo Chocolate Slushie

    This Oreo chocolate slushie combines crushed cookies with a creamy, icy base to create a cold, dessert-like beverage. It features tiny cookie bits suspended in a smooth, frozen mixture that offers a rich, chocolaty flavor with a refreshing texture. The drink is prepared by blending ingredients into a frosty, scoopable consistency and served immediately for a satisfying treat.
    Prep Time 10 minutes
    Total Time 10 minutes
    Servings: 2
    Course: Main Course
    Cuisine: Dessert
    Calories: 250

    Ingredients
      

    • 1 cup frozen milk chilled
    • 8 ounces vanilla or chocolate ice cream for creaminess
    • 6 cookies Oreos crushed
    • 2 tablespoons chocolate syrup optional, for extra flavor
    • 0.5 cup milk for blending

    Equipment

    • Blender
    • Measuring cups and spoons

    Method
     

    1. Place the crushed Oreos into a blender along with the milk, frozen milk, ice cream, and chocolate syrup if using. This will give the slushie a rich chocolate flavor with cookie chunks.
    2. Blend the mixture on high until the cookies are broken down and the mixture becomes thick, frosty, and slightly granular with tiny cookie bits visible throughout.
    3. Stop blending and check the consistency; it should be scoopable, with a slushy texture. If too thick, add a splash more milk and blend briefly.
    4. Pour the slushie into glasses immediately for the best texture and serve with a straw or a spoon. Optional: Garnish with extra crushed Oreos or a drizzle of chocolate syrup.

    Notes

    For an extra creamy texture, use full-fat ice cream. Adjust the number of Oreos for stronger cookie flavor or more crunch.
    This Oreo slushie isn’t just a treat—it’s a quick escape to simpler times, a cool reward for busy days. Its versatility means you can tweak sweetness levels or add extra toppings to match your mood.

    In a world where everything moves fast, taking a moment with something as simple as this frozen delight feels genuinely satisfying. Sometimes, the best comfort comes in a cup filled with childhood favorites turned refreshingly chilly.

  • Spooky Sophistication: Halloween Spider Cheese Ball

    Spooky Sophistication: Halloween Spider Cheese Ball

    Every October, I indulge in the ritual of transforming simple ingredients into something delightfully creepy. This Halloween Spider Cheese Ball is my ode to the chaotic fun of the season, blending childhood nostalgia with culinary whimsy. Its crunchy exterior and creamy center mimic the spider’s intricate web and unsettling legs, crafting a centerpiece that’s as tasty as it is terrifying.

    What makes this recipe unique is how easily it morphs from charming to spooky with just a few touches. It’s perfect for Halloween parties where the goal is to surprise, amuse, and delight. The best part? It’s surprisingly simple, even amidst the chaos of last-minute preparations.

    Halloween Spider Cheese Ball

    The Halloween Spider Cheese Ball is a creamy cheese mixture shaped into a round ball, with crunchy exterior accents and spider leg details made from edible ingredients. It features a smooth, cheesy interior resembling a web-like, gooey texture, adorned with spider legs for a spooky presentation. The dish combines melting cheese flavors with crunchy and decorative elements, resulting in a playful appetizer with a textured appearance.
    Prep Time 20 minutes
    Total Time 20 minutes
    Servings: 8
    Course: Main Course
    Cuisine: Various
    Calories: 250

    Ingredients
      

    • 16 oz cream cheese softened
    • 2 cups shredded cheddar cheese
    • 1 tablespoon Worcestershire sauce
    • 1 teaspoon garlic powder
    • 1/2 teaspoon black pepper
    • Puffed rice or crushed pretzels crunchy coating (optional) for exterior texture
    • Broken pretzels or breadsticks spider legs for decoration
    • Optional small edible eyes or black olives for spider face

    Equipment

    • Mixing bowl
    • Plastic wrap
    • Spoon or spatula
    • Baking sheet
    • Parchment paper
    • Broken pretzels or breadsticks for legs
    • Cheese shredding tool or grater

    Method
     

    1. In a large mixing bowl, combine the softened cream cheese and shredded cheddar cheese, mixing until smooth and fully blended.
    2. Add the Worcestershire sauce, garlic powder, and black pepper to the cheese mixture, stirring well to incorporate all the flavors.
    3. Shape the cheese mixture into a compact round ball using your hands or a spatula, then wrap it tightly in plastic wrap. Chill in the refrigerator for at least 30 minutes to firm up.
    4. Once chilled, transfer the cheese ball onto a serving platter and gently roll it in crushed puffed rice or pretzels to create a crunchy exterior resembling a web or cocoon.
    5. Arrange broken pretzels or breadsticks on top of the cheese ball to resemble spider legs, inserting them partially into the cheese to secure them.
    6. If desired, add small edible eyes or black olives to the front of the cheese ball to create a spooky spider face.
    7. Bring the Cheese Ball out just before serving. The combination of a creamy interior, crunchy exterior, and spooky decorations makes it a fun centerpiece for Halloween parties.

    Notes

    Chill the cheese ball sufficiently to make shaping easier and to set the exterior coating. Use small edible decorations for added spooky effects.

    Creating this Spider Cheese Ball is a playful way to celebrate the spooky season without losing your mind in the kitchen. Its unexpected presentation sparks conversations and laughter, making it a memorable part of the festivities. Plus, its rich, cheesy aroma will fill your home with the comforting scent of holiday cheer.

    As the night winds down, this dish becomes a fun, edible centerpiece that kids and adults alike can enjoy. It’s a perfect blend of chaos and comfort, embodying the spirit of Halloween. Sometimes, the most memorable moments come from the quirkiest recipes.

  • Spooktacular Secrets: Crafting Perfect Halloween Ghost Brownies

    Spooktacular Secrets: Crafting Perfect Halloween Ghost Brownies

    Halloween is the one night when chaos turns charming and the kitchen becomes a haunted laboratory. These Ghost Brownies are not just treats; they’re a spooky celebration of chocolate, with a touch of ghostly whimsy. Crafting them is a bit of playful mischief, perfect for those who love unique twists on classic desserts.

    What sets these brownies apart is the delicate balance of gooey richness and the playful ghostly accents that make everyone smile. Imagine the smell of melting chocolate mingling with a hint of vanilla, all set against the thrill of Halloween. It’s a simple project with big, memorable results that bring a little magic to the spooky season.

    Ghost Brownies

    Ghost Brownies are rich, fudgy chocolate desserts with a chewy texture, topped with ghostly white decorations for a spooky Halloween theme. The recipe involves mixing melted chocolate with eggs and sugar, baking until just set, then adding playful ghost accents on top. The final appearance features dark, glossy brownies with cute, white ghost faces, perfect for festive celebrations.
    Prep Time 15 minutes
    Cook Time 25 minutes
    Total Time 40 minutes
    Servings: 12
    Course: Main Course
    Cuisine: American
    Calories: 210

    Ingredients
      

    • 1 cup unsweetened cocoa powder for richness
    • 1 cup all-purpose flour for structure
    • 1/2 cup granulated sugar sweetens the brownies
    • 1/2 cup brown sugar adds depth of flavor
    • 1/2 cup unsalted butter melted for richness
    • 2 large eggs for binding
    • 2 teaspoons vanilla extract flavor enhancer
    • 1/2 cup all-purpose flour for structure
    • 2 teaspoons milk milk or heavy cream to thin the icing
    • black food coloring gel or liquid for ghost eyes and mouths

    Equipment

    • Mixing bowls
    • Baking pan
    • Whisk
    • Spatula
    • Piping bags or plastic bags

    Method
     

    1. Preheat your oven to 350°F (175°C) and line a baking pan with parchment paper.
    2. Melt the butter in a microwave or on the stove until just melted, then stir in the cocoa powder to form a smooth mixture. This creates a rich chocolate base.
    3. In a large bowl, whisk together the eggs, granulated sugar, and brown sugar until the mixture is smooth, light, and slightly fluffy, about 2 minutes. The sugars should be well incorporated and the mixture slightly increased in volume.
    4. Gradually pour the melted chocolate mixture into the egg and sugar mixture, whisking constantly to combine evenly. The batter will darken and become glossy.
    5. Stir in the vanilla extract for added flavor, then sift in the remaining flour and fold gently with a spatula until no streaks remain. Be careful not to overmix to keep the brownies tender.
    6. Pour the batter into the prepared baking pan, spreading it evenly with a spatula to smooth the top.
    7. Bake for 25–28 minutes, or until a toothpick inserted in the center comes out with moist crumbs. The edges should feel firm but the center still slightly soft.
    8. Allow the brownies to cool completely in the pan on a wire rack—this helps them set and makes cutting easier.
    9. Once cooled, melt the white chocolate chips in short bursts in the microwave, stirring in between until smooth. Thin with milk or heavy cream to get a pipeable consistency.
    10. Transfer the melted white chocolate into piping bags or plastic zip-top bags and snip a small corner for piping. Pipe ghost shapes onto each brownie, then add small dots for eyes and tiny M shapes for mouths, using black food coloring for details.
    11. Let the decorations set at room temperature until firm. Slice the brownies into squares and serve these spooky treats for a fun Halloween dessert.

    Notes

    For easier decorating, consider refrigerating the decorated brownies for 10-15 minutes to set the white chocolate ghosts before serving.

    These Ghost Brownies are a playful addition to any Halloween spread. They combine the rich, gooey appeal of brownies with charming ghost faces that steal the show. The best part? They’re as easy to make as they are fun to show off.

    As the season deepens, these treats become more than just dessert — they’re a mood, a memory, and a little spooky delight. Whether for kids or the young at heart, they bring the right amount of chaos and charm to your haunted table. All in all, a perfect mix of sweet and spooky for this haunting season.

  • Unearth the Creepiest Delicacy: Halloween Brain Jello Mold

    Unearth the Creepiest Delicacy: Halloween Brain Jello Mold

    Every October, I find myself drawn to recipes that turn the ordinary into the astonishingly spooky. This Halloween Brain Jello Mold does more than just look gross; it sparks a playful chaos in the kitchen. The aroma of fruity gelatin mingling with a hint of vanilla instantly transports you to a haunted graveyard scene, perfect for non-traditional spooky parties.

    Creating this eerie concoction feels like crafting a piece of edible art. The squishy texture and vibrant, brain-like appearance make it a showstopper on the dessert table. It’s the kind of recipe that invites giggles and gasps alike, breaking the ice at any Halloween gathering.

    Halloween Brain Jello Mold

    The Halloween Brain Jello Mold is a gelatin dessert crafted to resemble a human brain, featuring a squishy, gelatinous texture and vibrant, pinkish-red appearance. Made by layering flavored gelatin to achieve the brain-like folds and ridges, it is a playful yet spooky centerpiece for Halloween parties.
    Prep Time 20 minutes
    Cook Time 10 minutes
    Total Time 30 minutes
    Servings: 8
    Course: Main Course
    Cuisine: Halloween
    Calories: 80

    Ingredients
      

    • 3 cups fruit-flavored gelatin (e.g., cherry or raspberry) divided into two parts
    • 1 cup boiling water for dissolving the gelatin
    • 1 cup cold water to cool the gelatin before pouring
    • 1/2 cup vanilla extract adds flavor and aroma
    • Red or pink food coloring optional to enhance color for a more eerie look

    Equipment

    • Saucepan
    • Mixing bowls
    • Rubber spatula
    • Brain-shaped mold or Bundt pan
    • Measuring cups and spoons
    • Whisk

    Method
     

    1. Start by boiling water and pouring it over half of the powdered gelatin in a mixing bowl. Whisk until fully dissolved, creating a vibrant, syrupy mixture that smells fruity.
    2. Add cold water and vanilla extract to the dissolved gelatin, then stir gently to combine. If desired, add a few drops of food coloring to intensify the color, mixing until uniform.
    3. Pour the gelatin mixture into your mold or a bundt pan, filling it about halfway. Place it in the refrigerator and let it set for about 10-15 minutes until firm but still slightly sticky.
    4. Meanwhile, prepare the second batch of gelatin by repeating the process with the remaining powder and boiling water, then add cold water and vanilla. Mix well and color as before.
    5. Once the first layer is slightly firm, gently pour the second gelatin mixture over it, aiming to distribute it evenly to create the layered, brain-like ridges. Return to the refrigerator and chill for another 15-20 minutes until fully set.
    6. When the gelatin is firm and fully set, carefully invert the mold onto a serving platter and gently tap to release. The dessert should hold its shape with detailed ridges resembling a brain’s surface.
    7. Slice the gelatin mold into sections for serving, revealing the intricate, brain-like folds. The final dessert has a shiny, slightly squishy appearance with textured ridges that look eerily realistic.
    8. Enjoy your spooky, squishy Halloween Brain Jello, perfect for creating a fun and ghoulish centerpiece.

    Notes

    For an extra creepy effect, add edible eye candies or use different colors for depth.

    This Halloween Brain Jello Mold captures the spirit of playful spookiness with ease. It’s perfect for those who love their holiday a little gruesome but totally fun. As the seasons shift and the nights grow longer, this dish adds a splash of eerie delight to any table.

    Enjoy watching the surprised reactions and savoring the strange yet satisfying texture. This creepy creation is a reminder that sometimes the most memorable treats are those that embrace a little chaos. Happy haunting and happy noshing!

  • Spooky Delicious: Halloween Pumpkin Cheesecake Bars

    Spooky Delicious: Halloween Pumpkin Cheesecake Bars

    Every year, as autumn leaves fall and the air grows crisp, I crave something both nostalgic and daring. These Halloween Pumpkin Cheesecake Bars strike that perfect balance, blending a creamy, spiced filling with a subtle crunch from the graham cracker crust. The twist? A whisper of cinnamon and nutmeg that awakens memories of childhood costume parties.

    Gathering ingredients feels like preparing for a festive ritual—smelling the warm pumpkin and spices instantly sets the mood. These bars aren’t just treats; they’re a conversation starter at any spooky gathering. The best part? They come together faster than you’d expect for such a show-stopping dessert.

    Halloween Pumpkin Cheesecake Bars

    These pumpkin cheesecake bars feature a creamy, spiced filling made with pumpkin puree, cream cheese, and warm holiday spices on a graham cracker crust. The dessert has a smooth, dense texture with a slight crumb from the crust, and is often topped with a light dusting of cinnamon or whipped cream for presentation.
    Prep Time 20 minutes
    Cook Time 25 minutes
    Total Time 45 minutes
    Servings: 12
    Course: Main Course
    Cuisine: American
    Calories: 300

    Ingredients
      

    • 1 cup Graham cracker crumbs for the crust
    • 1/4 cup granulated sugar for the crust
    • 1/2 cup unsalted butter melted, for the crust
    • 16 oz cream cheese softened
    • 3/4 cup granulated sugar for the filling
    • 1 cup canned pumpkin puree
    • 3 large eggs room temperature
    • 1 1/2 teaspoons ground cinnamon
    • 1/2 teaspoon ground nutmeg
    • 1/2 teaspoon salt

    Equipment

    • 9×9-inch baking pan
    • Mixing bowls

    Method
     

    1. Combine graham cracker crumbs and 1/4 cup of sugar in a mixing bowl. Pour in the melted butter and mix until the crumbs are evenly coated and resemble wet sand. Press this mixture firmly into the bottom of the baking pan to form an even crust.
    2. Bake the crust in a preheated oven at 350°F (175°C) for about 8 minutes or until lightly golden. Remove from oven and let it cool slightly while you prepare the filling.
    3. In a large mixing bowl, beat the softened cream cheese with an electric mixer until smooth and fluffy, about 2-3 minutes. Add the sugar and continue beating until combined and creamy.
    4. Add the canned pumpkin puree to the cream cheese mixture and beat until well incorporated, creating an orange-tinted, smooth filling.
    5. Break the eggs into a small bowl to check for shells, then one at a time, add them to the filling while mixing on low speed. Mix just until combined after each addition.
    6. Mix in the ground cinnamon, nutmeg, and salt, stirring until the spices are evenly distributed and the filling is smooth.
    7. Pour the pumpkin cheesecake filling over the cooled graham cracker crust, spreading it out evenly with a spatula for a flat, smooth top.
    8. Bake in the oven at 350°F (175°C) for about 17-20 minutes, or until the edges are set but the center still slightly jiggles when gently shaken.
    9. Remove the pan from the oven and let it cool completely on a wire rack, which helps the filling set and prevents cracking.
    10. Once cooled, refrigerate the bars for at least 2 hours or until thoroughly chilled and firm.
    11. Cut into squares and optionally dust with cinnamon or add whipped cream on top before serving. Enjoy the rich, spiced pumpkin flavor!

    Notes

    For a richer flavor, refrigerate the bars overnight before serving. You can also add a layer of whipped cream or decorate with candy for festive presentation.

    This pumpkin cheesecake bar recipe is a reminder that holiday treats can be both playful and impressive. The blend of comforting spices and the smooth, rich filling makes it a perfect centerpiece for a fall gathering or a late-night snack.

    Every time I make these, I feel a surge of seasonal joy—a small, edible piece of Halloween magic. Plus, they’re surprisingly simple to whip up, leaving more time to enjoy the spooky season’s little joys.

  • Layered Comfort: The Surprising Charm of Lasagna Soup

    Layered Comfort: The Surprising Charm of Lasagna Soup

    Many think of lasagna as a hefty, layered casserole best served in slices. But what if you could capture that rich, cheesy flavor in a bowl that’s faster to make and easier to enjoy? Enter lasagna soup—an unexpected twist that transforms your favorite Italian flavors into a cozy, spoonable delight.

    This dish came into my life during a hectic week when time was tight but craving comfort was high. It’s a perfect mashup of rustic, hearty broth with all the indulgent goodness of lasagna—minus the fuss. Every spoonful is like a warm hug with a burst of marinara, melting cheese, and tender noodles.

    Lasagna Soup

    Lasagna soup combines the hearty, cheesy flavors of traditional lasagna into a comforting, brothy soup. It features savory tomato broth, tender pasta, and melted cheese, creating a rich and satisfying final dish with a smooth, layered appearance. The dish is cooked through simmering and combined in a single pot for easy preparation.
    Prep Time 10 minutes
    Cook Time 25 minutes
    Total Time 35 minutes
    Servings: 4
    Course: Main Course
    Cuisine: Italian
    Calories: 350

    Ingredients
      

    • 1 tablespoon olive oil for sautéing
    • 1 medium yellow onion finely chopped
    • 3 cloves garlic minced
    • 1 can (28 oz) crushed tomatoes unsalted or low-sodium preferred
    • 4 cups chicken or vegetable broth
    • 1 cup small pasta shells uncooked
    • 1 cup mozzarella cheese shredded
    • ½ cup Parmesan cheese grated
    • 1 tablespoon basil fresh, chopped (optional)
    • to taste salt and pepper for seasoning

    Equipment

    • Large pot or Dutch oven
    • Wooden spoon or spatula

    Method
     

    1. Heat the olive oil in a large pot over medium heat, and once shimmering, add the chopped onion. Sauté, stirring frequently, until the onion becomes translucent and fragrant, about 5 minutes.
      1 tablespoon olive oil
    2. Add the minced garlic to the pot and cook for about 30 seconds until it becomes aromatic, taking care not to burn it.
      1 tablespoon olive oil
    3. Pour in the crushed tomatoes along with their juices, stirring to combine the ingredients and scrape up any bits stuck to the bottom for extra flavor.
      1 tablespoon olive oil
    4. Slowly pour in the chicken or vegetable broth, stirring well to blend everything smoothly. Bring the mixture to a gentle boil.
      1 tablespoon olive oil
    5. Add the uncooked small pasta shells to the boiling broth, stirring occasionally to prevent sticking. Reduce the heat to medium and simmer until the pasta is tender, about 10 minutes.
      1 tablespoon olive oil
    6. Stir in the shredded mozzarella and grated Parmesan cheeses, allowing them to melt into the soup for a creamy, cheesy texture.
      1 tablespoon olive oil
    7. Season the soup with salt and pepper to taste, then sprinkle with freshly chopped basil if using, and stir to combine all flavors.
      1 tablespoon olive oil
    8. Simmer the soup for another 2-3 minutes until everything is heated through and the flavors meld together beautifully.
    9. Serve hot in bowls, making sure each serving has a good mix of broth, pasta, and melted cheese for a hearty, satisfying meal.

    Notes

    You can add cooked ground beef or Italian sausage for extra protein. Leftovers keep well refrigerated for up to 3 days; reheat gently to avoid breaking down the pasta.

    Lasagna soup isn’t just a meal; it’s a quick escape to Italy’s kitchen, even on the busiest days. Its layers of flavor and texture make dinner both satisfying and surprisingly simple.

    As the season turns cooler, this dish gains even more appeal. It’s a reminder that comfort food doesn’t have to be complicated—sometimes, it just needs to be cozy and nourishing. Enjoy every spoonful of this revival of a beloved classic.

  • Spook-tacular Halloween Guacamole & Bat-Shaped Tortilla Chips

    Spook-tacular Halloween Guacamole & Bat-Shaped Tortilla Chips

    This Halloween, I’m ditching the usual dip for something that sparks both nostalgia and a touch of chaos. Imagine creamy, herb-infused guacamole, swirling with just enough lime to make your taste buds dance, paired with tortilla chips meticulously shaped like adorable bats. The aroma of fresh cilantro and garlic is a siren song that beckons everyone to gather around.

    What makes this recipe special isn’t just its spooky aesthetic but how it brings a playful yet elegant touch to your festive table. The bat shapes add a whimsical flair, turning a simple snack into a conversation starter. Plus, it’s quick to put together, leaving more time for costume chaos and pumpkin carving.

    Halloween Bat-Shaped Guacamole with Tortilla Chips

    This dish features creamy guacamole infused with herbs, lime juice, garlic, and cilantro, resulting in a smooth, vibrant green dip. The guacamole is decorated with playful bat-shaped tortilla chips made from cut and baked or fried tortillas, creating a festive and visually appealing appetizer for Halloween parties.
    Prep Time 15 minutes
    Cook Time 10 minutes
    Total Time 25 minutes
    Servings: 4
    Course: Main Course
    Cuisine: Fusion
    Calories: 150

    Ingredients
      

    • 3 ripe avocados halved, pitted, and scooped out
    • 1 lime lime juice freshly squeezed
    • 2 cloves garlic minced
    • 1/4 cup fresh cilantro chopped
    • 1/2 teaspoon salt
    • 4 small tortillas flour or corn tortillas, cut into bat shapes
    • 2 tablespoons vegetable oil for baking or frying

    Equipment

    • Mixing bowl
    • Fork or potato masher
    • Baking sheet or frying pan
    • Sharp knife
    • Cutting board

    Method
     

    1. Slice the avocados in half, remove the pits, and scoop the flesh into a mixing bowl.
    2. Add freshly squeezed lime juice and minced garlic to the avocados.
    3. Use a fork or potato masher to mash the mixture until smooth and creamy, with some small chunks remaining.
    4. Stir in chopped cilantro and a pinch of salt to enhance the flavor.
    5. Preheat your oven to 375°F (190°C) or prepare a frying pan with oil for frying the bat chips.
    6. Use a sharp knife and a bat-shaped cookie cutter or freehand cut tortillas into bat silhouettes.
    7. If baking, arrange the tortilla bats on a baking sheet and lightly brush with vegetable oil.
    8. Bake in the oven for about 10 minutes until crispy and golden brown, or fry in hot oil until bubbling and crisp.
    9. Remove the bat chips from the oven or oil and let them cool slightly on a paper towel.
    10. Serve the creamy guacamole in a bowl, garnished with additional cilantro if desired, alongside the crispy bat-shaped tortilla chips.
    11. Enjoy this festive and fun Halloween snack as an appetizer or party dip!
    Whether you’re hosting a haunted house or just want a fun snack, this guacamole with bat-shaped chips is a perfect pick. It’s a simple way to elevate your Halloween spread and get everyone excited about dipping.

    Enjoy the vibrant green, the crunch, and that touch of Halloween magic. There’s something about creating edible art that makes the night all the more memorable. Happy haunting and snacking!