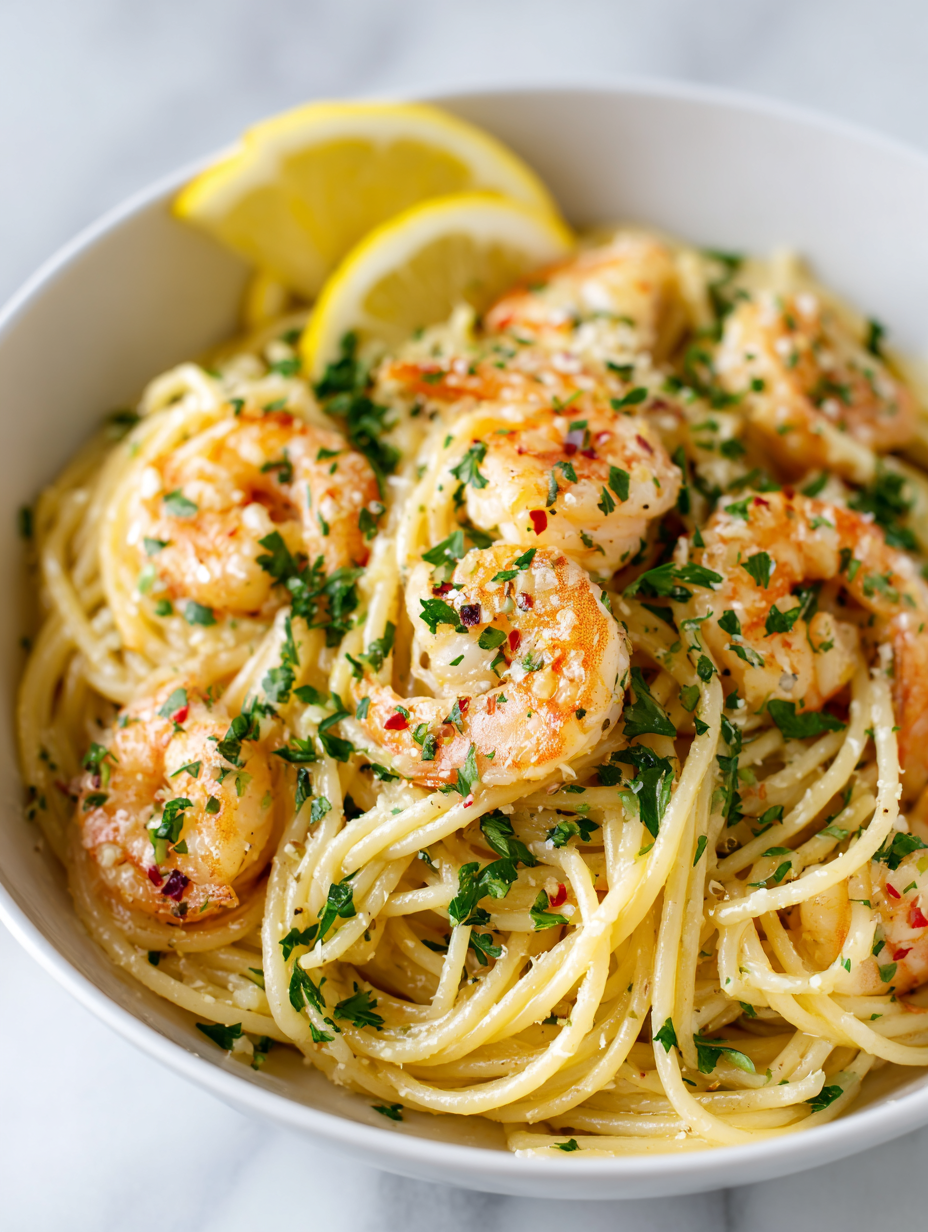
Author: EllaDavis

  • Warm Your Autumn: Fall Turkey Chili with Sweet Potatoes

    Warm Your Autumn: Fall Turkey Chili with Sweet Potatoes

    As the leaves turn golden and the air crisps, I find myself craving something hearty yet vibrant. This Fall Turkey Chili combines the earthy sweetness of roasted sweet potatoes with the savory richness of turkey, creating a comforting bowl that celebrates the season.

    What sets this recipe apart is its unexpected depth of flavor. Spiced with cinnamon and smoked paprika, it offers a hint of warmth with each spoonful, making it perfect for cozy season gatherings or quiet nights alone.

    Layered with fresh herbs and topped with a dollop of sour cream or a sprinkle of shredded cheese, it’s a dish that feels both nostalgic and invigorating. Plus, it’s flexible enough to adapt to what I’ve got in the pantry!

    Fall Turkey Chili with Sweet Potatoes

    This fall-themed turkey chili features chunks of roasted sweet potatoes and ground turkey simmered with spices like cinnamon and smoked paprika, resulting in a hearty and flavorful stew. The dish has a thick, chunky texture and vibrant seasonal colors, topped with herbs and optional dairy for added richness.
    Prep Time 15 minutes
    Cook Time 45 minutes
    Total Time 1 hour
    Servings: 4
    Course: Main Course
    Cuisine: American
    Calories: 350

    Ingredients
      

    • 2 large sweet potatoes peeled and cubed
    • 1 tablespoon olive oil
    • 1 pound ground turkey
    • 1 medium onion diced
    • 2 cloves garlic minced
    • 1 can (14 oz) diced tomatoes
    • 1 cup chicken broth
    • 1 teaspoon cinnamon ground
    • 1/2 teaspoon smoked paprika
    • to taste salt and pepper
    • Fresh herbs (cilantro or parsley) chopped, for garnish
    • Optional sour cream or shredded cheese for topping

    Equipment

    • Baking sheet
    • Large pot or Dutch oven
    • Cutting board
    • Chef’s knife
    • Wooden spoon or spatula

    Method
     

    1. Preheat the oven to 400°F (200°C). Toss the cubed sweet potatoes with a tablespoon of olive oil, salt, and pepper, then spread them evenly on a baking sheet. Roast for about 25-30 minutes until tender and slightly caramelized, stirring halfway through.
    2. While the sweet potatoes roast, heat a large pot over medium heat. Add a splash of olive oil and sauté the diced onion until translucent and fragrant, about 5 minutes.
    3. Add the minced garlic to the onions and cook for another minute until aromatic. Then, crumble the ground turkey into the pot, cooking until browned and cooked through, about 8 minutes. Break it apart with your spoon as it cooks.
    4. Pour in the diced tomatoes with their juice and the chicken broth. Stir in the ground cinnamon and smoked paprika, then season with salt and pepper to taste. Bring the mixture to a gentle simmer.
    5. Once the sweet potatoes are out of the oven and tender, add them directly to the chili. Gently fold the roasted sweet potatoes into the stew, allowing the flavors to meld. Let it simmer for another 10-15 minutes, uncovered.
    6. Taste and adjust seasonings as needed. Ladle the chili into bowls and garnish with chopped herbs. Add a dollop of sour cream or shredded cheese on top if desired for extra richness and creaminess.

    Notes

    For extra depth, add a splash of smoked chipotle in adobo or a dash of cayenne pepper. Feel free to swap out the herbs or toppings based on your preference.

    This chili isn’t just a meal; it’s an experience of fall’s bounty. The combination of tender turkey and sweet potatoes enveloped in a savory, spiced broth makes each bite memorable.

    As the days grow shorter, I cherish this dish’s ability to warm both my hands and my heart. It’s a reminder that good food, paired with seasonal ingredients, can turn an ordinary evening into something special.

  • Whimsical Pumpkin Cheesecake: A Cozy Fall Delight

    Whimsical Pumpkin Cheesecake: A Cozy Fall Delight

    Imagine a pumpkin cheesecake infused with unexpected hints of ginger and a dash of toasted pecans on top. This recipe transforms the traditional fall dessert into a whimsical creation that sparks nostalgia and playfulness. Its silky texture paired with warm spices makes each bite a comforting experience, perfect for cool evenings.

    What sets this cheesecake apart is its surprising crust made from gingersnap cookies, adding a spicy crunch that complements the creamy filling. It’s not just a dessert; it’s a story in every slice, blending memories of pumpkin patches with a modern twist. A little chaos in the kitchen yields a surprisingly charming result that invites smiles and shared memories.

    Pumpkin Ginger Cheesecake with Toasted Pecans

    This pumpkin cheesecake features a creamy filling infused with warm ginger spices, poured into a gingersnap cookie crust. Topped with toasted pecans, the dessert has a smooth, velvety texture and a visually appealing golden-brown surface. The combination of fall flavors and crunchy topping creates a rich, comforting treat.
    Prep Time 30 minutes
    Cook Time 1 minute
    Total Time 1 minute
    Servings: 8
    Course: Main Course
    Cuisine: American
    Calories: 420

    Ingredients
      

    • 200 g gingersnap cookies for crust
    • 100 g unsalted butter melted
    • 450 g cream cheese softened
    • 1 cup granulated sugar
    • 1/2 cup pumpkin puree canned or homemade
    • 3 large eggs
    • 1 1/2 te teaspoons ground ginger adjust to taste
    • 1/2 teaspoon ground cinnamon
    • 1/4 teaspoon ground nutmeg
    • 1/4 teaspoon salt
    • 1/2 cup heavy cream
    • 1 cup toasted pecans for topping

    Equipment

    • Springform pan
    • Mixing bowls
    • Electric mixer or whisk
    • Measuring cups and spoons
    • Rubber spatula
    • Toaster or oven for toasting pecans

    Method
     

    1. Start by crushing the gingersnap cookies until fine, then mix them with the melted butter until well combined. Press this mixture firmly into the bottom of a springform pan to create an even crust. Chill in the refrigerator while preparing the filling.
    2. In a large mixing bowl, beat the softened cream cheese until smooth and fluffy using an electric mixer or whisk, about 2-3 minutes.
    3. Add sugar gradually and beat until fully incorporated and the mixture is creamy.
    4. Mix in pumpkin puree along with ground ginger, cinnamon, nutmeg, and salt, blending until smooth and aromatic.
    5. One at a time, add eggs and beat just until combined after each addition. The batter should be smooth and slightly thickened.
    6. Stir in heavy cream to loosen the mixture and add a silky texture.
    7. Pour the pumpkin mixture over the chilled crust, smoothing the top with a spatula for an even surface.
    8. Bake the cheesecake in a preheated oven at 350°F (175°C) for about 60 minutes, or until the edges are set and the center slightly jiggles.
    9. Remove from the oven and let cool completely in the pan on a wire rack, allowing the filling to set further as it cools.
    10. While the cheesecake cools, toast the pecans lightly in a dry skillet or toaster oven until fragrant and slightly browned, about 3-5 minutes.
    11. Chop the toasted pecans coarsely and sprinkle them generously over the cooled cheesecake for a crunchy topping.
    12. Slice the cheesecake, serve, and enjoy the creamy, spiced pumpkin filling with a crunchy pecan topping that celebrates seasonal flavors.

    This pumpkin cheesecake is more than just a seasonal treat; it’s an invitation to slow down and indulge in simple joys. Its aroma alone can transport you to a cozy fall afternoon, even if you’re indoors. Sharing this dessert can turn a regular gathering into a cherished moment.

    Whether served alongside a flickering candle or a crackling fire, it captures the essence of fall in every forkful. A perfect balance of comfort and creativity, it reminds us that desserts can be both nostalgic and innovative. The season’s best kept secret is finally revealed in every luscious slice.

  • Monster Mash Burgers: The Spookiest Halloween Feast

    Monster Mash Burgers: The Spookiest Halloween Feast

    Halloween is the perfect excuse to turn basic burgers into creepy, crawly monsters that wow guests and kids alike. This year, I decided to add a whimsical twist by crafting burgers that look straight out of a mad scientist’s lab. Bright green buns, googly eyes made of olives, and sinister fake teeth create a chaos of color and texture that scream fun.

    But these aren’t just for silly pictures; they pack all the hearty, satisfying flavors of classic burgers with a playful, spooky makeover. It’s all about embracing chaos in the kitchen and turning simple ingredients into a haunting experience. Plus, they’re perfect for quick prep—who doesn’t love a dish that’s a little wild but still easy to assemble?

    **WHY I LOVE THIS RECIPE?**

    • The joy of transforming familiar ingredients into visually shocking creations.
    • Rekindling childhood memories of dressing up for Halloween and sneaking bites of candy.
    • The chaos—the messy green buns, the googly eyes—feels just right for a festive night.
    • Sharing these with friends sparks laughter and amazement, making the evening extra memorable.
    • It turns a boring dinner into a playful, giggly event that everyone remembers.

    AVOID MY DISASTER (You’re Welcome)

    • FORGOT to cheese the eyes, leaving them falling apart—use a dab of cream cheese instead.
    • DUMPED too much ketchup on a monster face, blurring details—stick to small dots for eyes.
    • OVER-TORCHED the buns, turning them black—set a timer and keep a close eye.
    • SKIPPED toasting the buns, making them soggy—give them a quick toast for extra crunch.

    QUICK FIXES THAT SAVE YOUR DAY

    • When eyes collapse, splash a little mayo to stabilize them—crunchy texture revives the look.
    • Patch a kneaded green bun with fresh lettuce if it chars too dark.
    • Shield melted cheese from over-browning using a foil tent—smells fresh and inviting.
    • If ketchup spills, wipe immediately to keep the chaos neat—clean counters win.
    • When bread is stale, substitute with fresh slider buns for instant freshness—crackling crust guaranteed.

    Spooky Halloween Monster Burgers

    This dish features beef patties cooked until juicy, assembled into fun monster burgers. Bright green buns made from colored bread or buns, topped with playful decorations like olive eyes and cheese teeth, create a chaotic and colorful Halloween-themed presentation. The final look is whimsical and playful, with textured, gooey, and crispy elements.
    Prep Time 15 minutes
    Cook Time 20 minutes
    Total Time 35 minutes
    Servings: 4
    Course: Main Course
    Cuisine: Halloween
    Calories: 650

    Ingredients
      

    • 1 pound ground beef preferably 80% lean
    • 4 pieces buns preferably bright green-colored
    • 4 slices cheddar cheese for teeth and eyes
    • 1 can black olives pitted and sliced for eyes
    • 2 tablespoons mayonnaise optional, for stabilization
    • to taste ketchup for monster faces
    • 1 tablespoon olive oil for greasing
    • optional colored food coloring for dying buns green

    Equipment

    • Grill or stovetop skillet
    • Cooking spatula
    • Baking sheet
    • Small spoon or piping bag
    • Knife
    • Cutting board

    Method
     

    1. Preheat your grill or skillet over medium-high heat and lightly brush with olive oil. Form the ground beef into four equal patties, about ¾-inch thick, and season with salt and pepper if desired.
    2. Place the patties on the hot grill or skillet, cooking for about 4-5 minutes per side until nicely browned and cooked through. You should see juices bubbling and the edges crisping up.
    3. While the burgers cook, prepare the green buns by adding a few drops of food coloring to the bread or bun dough, or use pre-colored buns. Toast the buns lightly in the oven or on a skillet until just golden around the edges.
    4. Once cooked, place each beef patty on a bun bottom. Top with slices of cheese cut into small shapes for teeth, and chopped olives for eyes. Use small drops of mayonnaise to stabilize the olive eyes if needed.
    5. Add ketchup in small dots or squiggles to create spooky monster faces or injuries. Cover with the top buns, pressing gently to help everything hold together.
    6. Decorate the buns with additional olive slices or cheese if desired to enhance the monstrous appearance. Serve immediately for a fun, creepy presentation that’s perfect for Halloween.

    Notes

    Use bright green food coloring for buns. For extra fun, add other decorations like lettuce or extra cheese pieces. Keep an eye on the burgers while cooking to prevent over-charring the buns.
    These monstrous burgers are more than just a visual delight; they bring a nostalgic thrill that’s perfect for Halloween parties. They turn simple ingredients into a dynamic horror show on your plate, full of textures and playful quirks. Making them is a messy, joyous event—exactly what festive chaos should be about.

    Sharing these with friends creates moments of laughter and wonder that linger long after the night ends. They remind us that good food can be as fun as it is filling. So, embrace the chaos and revel in this Halloween-themed culinary adventure—your taste buds and guests will thank you.

  • Secret Cinnamon-Apple Swirl Cake You’ll Love

    Secret Cinnamon-Apple Swirl Cake You’ll Love

    Imagine biting into a warm slice of apple cake, but with an unexpected twist: a cinnamon sugar swirl that makes every bite feel like autumn in your mouth. This recipe transforms the usual apple dessert into a comforting, fragrant experience that’s perfect for crisp mornings or cozy afternoons. It’s not just a cake; it’s a memory wrapped in buttery layers and festive spices.

    I’ve always been enchanted by how certain flavors evoke nostalgia, and cinnamon with apple does just that. What makes this cake special isn’t just the pearly glaze or tender crumb; it’s the way the cinnamon swirl ripples through each piece, creating tiny pockets of warmth. It’s a bit unconventional, but the extra effort makes the ordinary extraordinary.

    Apple Cinnamon Swirl Cake

    This apple cinnamon swirl cake features a tender crumb infused with fresh apple pieces and a fragrant cinnamon sugar mixture that ripples through the batter. The cake is baked until golden and topped with a glossy pearly glaze, offering a soft, moist texture with visible cinnamon layers. Its appearance showcases a beautifully marbled swirl pattern that hints at warm, cozy flavors.
    Prep Time 20 minutes
    Cook Time 40 minutes
    Total Time 1 hour
    Servings: 8
    Course: Main Course
    Cuisine: American
    Calories: 310

    Ingredients
      

    • 2 cups all-purpose flour sifted
    • 1 cup granulated sugar
    • 1/2 cup unsalted butter melted
    • 2 large eggs
    • 1 teaspoon vanilla extract
    • 1/2 cup milk
    • 2 cups peeled and chopped apples about 2 medium apples
    • 1 cup granulated sugar
    • 1 tablespoon ground cinnamon

    Equipment

    • Mixing bowls
    • Whisk
    • Rubber spatula
    • Loaf or cake pan
    • Knife
    • Cutting board
    • Oven

    Method
     

    1. Preheat your oven to 350°F (175°C) and grease your cake or loaf pan to prevent sticking.
    2. In a large mixing bowl, whisk together the sifted flour and sugar until well combined and airy.
    3. Pour in the melted butter, eggs, vanilla extract, and milk, then whisk until the batter is smooth and slightly thickened.
    4. Gently fold in the chopped apples, ensuring they are evenly distributed throughout the batter.
    5. In a small bowl, mix together the sugar and cinnamon to create the cinnamon swirl mixture.
    6. Pour half of the batter into the prepared pan, then sprinkle evenly with half of the cinnamon sugar mixture.
    7. Add the remaining batter on top and smooth the surface with a spatula.
    8. Sprinkle the rest of the cinnamon sugar evenly over the top of the batter.
    9. Bake in the preheated oven for about 40 minutes, or until the top is golden and a toothpick inserted in the center comes out clean.
    10. Remove the cake from the oven and let it cool in the pan for 10 minutes, then transfer to a wire rack to cool completely.
    11. Optionally, drizzle with a pearly glaze or dust with powdered sugar for a finishing touch.
    12. Slice and serve the cake once cooled, revealing beautiful cinnamon swirls and moist apple pieces within.

    Seasonal and soulful, this apple cake invites everyone to gather around with mugs of tea or coffee. Its aroma alone signals comfort, making it an ideal pick for lazy Sundays or unexpected guests. The balance of sweet, tart, and spicy makes every forkful a small celebration of fall’s bounty.

    So next time you crave something homemade that balances simplicity and flair, give this recipe a try. It’s a delightful way to showcase fresh apples and remind yourself that good baking can turn simple ingredients into something memorable.

  • Spooky Sweetness: The Art of Halloween Jack-o’-Lantern Stuffed Peppers

    Spooky Sweetness: The Art of Halloween Jack-o’-Lantern Stuffed Peppers

    Most Halloween treats lean toward the sweet side, but I love flipping the script with savory, colorful stuffed peppers shaped like mini jack-o’-lanterns. They transform your kitchen into a haunted house, with vibrant orange peppers hollowed out and carved into cheerful or spooky faces. This not only sparks kids’ delight but also makes a stunning table centerpiece that’s edible.

    Shaping peppers to resemble tiny jack-o’-lanterns is surprisingly easy, and the sensory thrill of cutting into their smiling or grinning faces is pure joy. Filling them with seasoned rice, spiced ground meats, or even a medley of roasted vegetables turns each bite into a playful harmony of textures and flavors. It’s a Halloween project that combines creativity with comforting, hearty eating.

    Mini Jack-o’-Lantern Stuffed Peppers

    This dish features vibrant orange bell peppers carved into Halloween-themed faces, hollowed out and filled with a savory mixture of seasoned rice and ground meats. The peppers are baked until tender, producing a colorful, festive appetizer or main course with a cheerful appearance and satisfying texture.
    Prep Time 20 minutes
    Cook Time 30 minutes
    Total Time 50 minutes
    Servings: 4
    Course: Main Course
    Cuisine: American
    Calories: 250

    Ingredients
      

    • 4 large orange bell peppers preferably firm and colorful
    • 1 cup cooked rice preferably cooled
    • 0.5 pound ground meat (beef or turkey) or vegetarian alternative
    • 1 small onion finely chopped
    • 2 cloves garlic minced
    • 1 teaspoon chili powder for spicing
    • 1 tablespoon olive oil for sautéing
    • to taste salt and pepper for seasoning

    Equipment

    • Chef’s knife
    • Baking sheet
    • Spoon
    • Small paring knife
    • Mixing bowl

    Method
     

    1. Preheat your oven to 375°F (190°C). Line a baking sheet with parchment paper for easy cleanup.
    2. Using a small paring knife, carefully carve faces into each orange pepper, creating cheerful or spooky jack-o’-lantern expressions. Set aside the tops to use as lids later.
    3. Slice off the tops of the peppers and gently hollow out their insides with a spoon, removing seeds and membranes to create hollow shells that will be filled.
    4. Heat olive oil in a skillet over medium heat; add chopped onion and minced garlic, sautéing until fragrant and slightly translucent, about 3-4 minutes.
    5. Add the ground meat to the skillet, breaking it apart with a spoon, and cook until browned and cooked through, about 5-7 minutes.
    6. Stir in cooked rice, chili powder, salt, and pepper. Mix well and cook for another 2-3 minutes until heated through and flavorful.
    7. Spoon the hearty filling into each hollowed pepper, filling them generously without overflowing.
    8. Place the filled peppers on the prepared baking sheet, positioning their tops back or leaving open based on preference. Bake in the preheated oven for 20-25 minutes, until peppers are tender and slightly blistered at edges.
    9. Remove from the oven and let cool slightly before serving. The peppers will be vibrant, with carved facial expressions framing a savory filling inside.

    Notes

    For extra fun, add cheese or herbs as toppings before baking. Ensure peppers are cooked until tender for the best texture.

    In the end, these Halloween Jack-o’-Lantern Stuffed Peppers bring a fun, inviting spirit to your seasonal table. They’re perfect for casual gatherings, costumed parties, or just a fun family dinner when everything feels a little more magical. Plus, their vibrant appearance makes every bite a celebration of autumn’s bold colors and flavors.

    As the season deepens and the nights grow longer, dishes like this remind us that food can be both a playful art and a way of bringing people together. Whether you carve them on the stovetop or the cutting board, these peppers make Halloween a little brighter—and a lot tastier.

    ,

  • The Unexpected Charm of Gatorade Slushies on Hot Days

    The Unexpected Charm of Gatorade Slushies on Hot Days

    Imagine discovering a way to turn your favorite sports drink into a frosty, icy treat that cools you down instantly. Gatorade slushies aren’t just a quick fix for thirst; they’re a nostalgic nod to childhood summers and daring summer beverage adventures. The magic lies in dipping into that icy chaos with just a blender and a pitcher of your preferred flavor.

    This recipe embraces the wild side of hydration—frozen, sweet, and a little chaotic. It’s perfect for spontaneous backyard parties, lazy weekend afternoons, or when you just need a break from the usual. No fancy equipment needed, just a little patience and a good eye for the frozen moments.

    Gatorade Slushies

    Gatorade slushies are frozen, icy beverages made by blending sports drink with ice until it reaches a semi-frozen, slushy consistency. The mixture turns into a colorful, granular texture that’s both refreshing and visually appealing, ideal for hot days or casual gatherings.
    Prep Time 10 minutes
    Total Time 10 minutes
    Servings: 4
    Course: Main Course
    Cuisine: American
    Calories: 80

    Ingredients
      

    • 4 cups Gatorade any flavor of your choice
    • 2 cups ice cubes preferably crushed or small pieces

    Equipment

    • Blender
    • Pitcher

    Method
     

    1. Add the Gatorade to the blender along with the ice cubes and secure the lid.
    2. Blend the mixture on high speed until the ice is finely crushed and the mixture turns into a thick, slushy texture, about 1-2 minutes.
    3. Pause briefly to check the consistency; if it’s too thick, add a splash more Gatorade and blend again until smooth.
    4. Once well blended and icy, pour the slushie into glasses or cups for serving.
    5. Serve immediately with a straw or spoon to enjoy the cool, granular texture.

    Notes

    For extra flavor, try layering different Gatorade colors or adding fresh fruit pieces on top before serving.
    In a world overwhelmed by complicated recipes, this simple Gatorade slushie keeps things refreshingly straightforward. It’s a cool reminder that sometimes, the best pleasures are the easiest to make and the fastest to enjoy. Stay hydrated, have fun experimenting, and don’t be surprised if this becomes your go-to summer hack.

  • Chill in a Glass: The Art of Making a Perfect Frosé

    Chill in a Glass: The Art of Making a Perfect Frosé

    Imagine turning the vibrant pinks of summer into a frosty sip that cools the soul. This isn’t just any frozen drink; it’s a delicate dance of floral rosé, crisp fruit, and icy shards that shatter on your tongue.

    What I love about this recipe? It’s a magic trick that transforms a simple bottle of wine into a refreshing masterpiece. The process feels like a small celebration every time I slide the blender’s lid off and watch the colors swirl. Perfect for spontaneous gatherings or when I just need a moment to cool down and unwind.

    WHY I LOVE THIS RECIPE?

    • It combines two of my favorite things: wine and frozen treats, in one glass.
    • The vibrant pink reminds me of summer picnics and sunset evenings endlessly stretched ahead.
    • It’s so easy to customize with berries, citrus, or even a splash of bubbly for extra sparkle.
    • The anticipation of blending until icy and smooth never gets old.

    AVOID MY DISASTER (You’re Welcome)

    • FORGOT to freeze the wine overnight? Just use ice cubes—better than waiting!
    • DUMPED hot simple syrup into the mix? Rinse with cold water before blending next time.
    • OVER-TORCHED the sugar? Substitute with honey or agave syrup to avoid caramel notes.
    • FORGOT to strain the fruit? Leave pulp for a rustic texture or strain for elegance.

    QUICK FIXES THAT SAVE YOUR DAY

    • If your frosé is too runny, SPLASH in more frozen berries or ice.
    • When it’s too tart, PATCH with a touch of honey or peach nectar.
    • Shield from melting by serving immediately or chilling glasses beforehand.
    • If you forget to blend enough, just pulse again until uniform and icy.
    • When flavor feels dull, sprinkle a hint of fresh mint or basil for brightness.

    Frosé (Frozen Rosé Drink)

    Frosé is a cold, slushy beverage made by blending rosé wine with frozen fruit and ice, resulting in a vibrant pink, icy drink with a smooth, sorbet-like texture. The process involves freezing the wine, then blending it with fresh fruit and ice until creamy and refreshing for hot days or casual gatherings.
    Prep Time 10 minutes
    Total Time 10 minutes
    Servings: 4
    Course: Main Course
    Cuisine: American
    Calories: 150

    Ingredients
      

    • 2 bottles rosé wine chilled and preferably frozen overnight
    • 1 cup mixed berries fresh or frozen
    • 1 cup ice cubes to help achieve slushy texture
    • 1 tablespoon granulated sugar optional, adjust to taste

    Equipment

    • Freezer
    • Blender

    Method
     

    1. Pour the chilled rosé wine into a large freezer-safe container and freeze overnight until solid or sufficiently frozen.
    2. Let the frozen rosé sit at room temperature for a few minutes to slightly soften, making it easier to blend.
    3. Add the frozen rosé, berries, ice cubes, and optional sugar into a blender.
    4. Blend on high speed until the mixture is smooth, thick, and slushy, with no large chunks remaining. This may take about 30-60 seconds.
    5. Stop the blender and taste the mixture, adding more sugar if desired, then blend briefly again to incorporate.
    6. Pour the frosé into chilled glasses or cups, garnishing with a berry or a sprig of mint for visual appeal.

    Notes

    For a more colorful presentation, include additional fruit or edible flowers. Adjust the sweetness by adding more sugar or a splash of citrus juice. Serve immediately for the best icy, slushy texture.
    Pouring a glass of this icy rosé is like catching a cool breeze on a scorching day. It’s perfect for celebrating summer’s fleeting moments or simply escaping the chaos with a flavorful chill.

    Sometimes, the simplest pleasures—like a frosted glass of wine—make the most lasting memories. So, next time you need a quick refresh, remember this recipe. It might become your new favorite way to unwind with a bit of elegance and a splash of fun.

  • Chillin’ with Whiskey Slushie: A Forgotten Summer Treasure

    Chillin’ with Whiskey Slushie: A Forgotten Summer Treasure

    Imagine a summer evening where the air is thick with the scent of spicy bourbon and melting ice. This whiskey slushie isnt just a frozen drink; its a nostalgic nod to lazy afternoons and spontaneous gatherings. Its frosty charm transforms any mundane moment into a mini celebration of cold, sweet, spirited refreshment.

    What makes this recipe a jewel in my summer arsenal is its simplicity and the unexpected warmth of whiskey intertwined with icy sweetness. Its perfect for those lingering summer nights when you crave something that cools you down yet keeps your spirits high. Every sip offers a subtle glow of caramel and oak, reminiscent of a cozy bar on a sun-drenched porch.

    Whiskey Slushie

    A whiskey slushie is a frozen cocktail that combines whiskey, sweet syrups, and ice blended into a smooth, icy beverage. The mixture has a frosty texture with a glossy appearance, offering a refreshing, spirit-forward drink with hints of caramel and oak. It’s perfect for summer evenings when you want a cool, spirited treat.
    Prep Time 10 minutes
    Total Time 10 minutes
    Servings: 4
    Course: Main Course
    Cuisine: American
    Calories: 150

    Ingredients
      

    • 1 ½ cups whiskey
    • 1 cup simple syrup or honey for sweetness
    • 4 cups ice cubes
    • ½ cup cold water to help blend smoothly

    Equipment

    • Blender
    • Measuring cups

    Method
     

    1. Measure out the whiskey, simple syrup, ice cubes, and cold water, placing everything nearby for easy access.
    2. Add the ice cubes to the blender first, creating a base that starts to crush as the blades turn.
    3. Pour the whiskey and simple syrup over the ice in the blender, giving the mixture a sweet, spirited aroma.
    4. Pour in the cold water, which helps achieve a smooth, slushy consistency once blended.
    5. Secure the lid on the blender and blend on high for 30-45 seconds, until the mixture is icy, thick, and smooth with a glossy surface.
    6. Once blending is complete, check the texture—it should be uniformly frozen and scoopable, like a soft snow cone.
    7. Pour the whiskey slushie into chilled glasses, allowing the icy blend to mound attractively in each serving.
    8. Optionally, garnish with a twist of lemon peel or a cherry for a colorful finishing touch.
    This whiskey slushie is more than just a drink; its a tiny retreat from the chaos of everyday life. A few minutes of blending and youre transported, if only for a moment, to a place where summer never ends and worries melt away with the ice. Its a reminder that sometimes, the simplest pleasures truly hit home.

    As the season shifts and a chill settles in the air, I find myself craving this icy delight even more. It captures the spirit of warm nights and cool breezes, wrapped in a glass. Whether youre hosting friends or enjoying solitude, this whiskey slushie offers an instant escape in every frosty gulp.

  • Spooky Sophistication: Halloween Eyeball Caprese Bites

    Spooky Sophistication: Halloween Eyeball Caprese Bites

    Halloween is the perfect time to embrace the bizarre and turn your snack game into a conversation starter. These Eyeball Caprese Bites are a cheeky twist on a classic, with a hauntingly realistic appearance that’s surprisingly simple to achieve. Fresh mozzarella, vibrant basil, and a splash of balsamic make these bites not only spooky but also delightfully fresh.

    What sets this recipe apart? It’s the playful eeriness paired with effortless elegance—no fancy utensils or hard-to-find ingredients needed. They’re perfect for parties, or just a sneaky treat when you want to indulge in a bit of creepy culinary art. Plus, the pops of bright basil make each bite lively against the creamy cheese.

    Eyeball Caprese Bites

    Eyeball Caprese Bites are individual appetizer skewers featuring fresh mozzarella, basil, and cherry tomatoes crafted to resemble creepy eyeballs. They are assembled with toothpicks and finished with balsamic glaze for a striking, realistic appearance. The final presentation is juicy, creamy, and visually striking, perfect for Halloween parties.
    Prep Time 15 minutes
    Total Time 15 minutes
    Servings: 12
    Course: Main Course
    Cuisine: Party Appetizer
    Calories: 150

    Ingredients
      

    • 12 pieces cherry tomatoes for eyeball appearance
    • 12 ounces fresh mozzarella balls small mozzarella balls or cut into small discs
    • 12 leaves fresh basil leaves for the iris and color contrast
    • 3 tablespoons balsamic glaze for drizzling over the assembled bites

    Equipment

    • Toothpicks
    • Small spoon or brush

    Method
     

    1. Place each cherry tomato on a clean work surface and slice off the stem end to create an open cavity. This will serve as the “eyeball” socket.
    2. Carefully insert a fresh mozzarella ball into each tomato cavity, pressing gently to secure it and resemble an eyeball.
    3. Fold a basil leaf in half and place it on top of each mozzarella ball to mimic an iris and add a pop of vibrant green.
    4. Skewer each assembled eyeball with a toothpick, piercing through the tomato, mozzarella, and basil for stability and easy handling.
    5. Arrange all the skewers on a serving platter, keeping them upright for best visual effect.
    6. Using a small spoon or brush, drizzle balsamic glaze over each eyeball to create the appearance of bloodshot, veiny eyes for a creepy effect.
    7. Serve immediately to enjoy the fresh textures and striking appearance, or refrigerate briefly until ready to present.

    Notes

    For extra creepiness, you can add tiny black peppercorns on top of the mozzarella to resemble pupils.

    Crafting these Eyeball Caprese Bites turns into a fun little project that adds a spooky flair to your Halloween table. They’ll surprise your guests with their creepy charm and burst of fresh flavors. It’s a reminder that you can be both creative and polished, even during the season of frights.

    As the season transitions into cozy nights and pumpkin spice everything, these bites bring a whimsical touch to your festivities. They’re quick to assemble but leave a lasting impression—the perfect balance of fun and sophistication for any Halloween gathering.

  • Blue Raspberry Slushie: A Refreshing Twist for Summer

    Blue Raspberry Slushie: A Refreshing Twist for Summer

    As someone who loves to experiment with frozen treats, I recently stumbled upon a vintage flavor that deserves a comeback—blue raspberry. The vibrant color and tart-sweet taste make it more than just a nostalgic candy; it’s a thrilling way to chill out on hot days. This slushie isn’t just a drink, it’s a splash of childhood chaos in a glass.

    Mixing up this bright blue beverage feels like wielding a magic wand that transforms ordinary ice into a sparkling, flavored feast. It’s surprisingly simple yet offers a pop of vivid color and icy coolness that everyone craves when temperatures soar. Perfect for spontaneous gatherings or a solo moment of joy, it refreshes faster than you can say “blue raspberry.”

    Blue Raspberry Slushie

    This vibrant frozen drink is made by blending ice with blue raspberry flavoring and sweetener until smooth and slushy. The final texture is icy and refreshing with a bright blue color and tart-sweet flavor, perfect for hot days or nostalgic treats.
    Prep Time 5 minutes
    Total Time 5 minutes
    Servings: 2
    Course: Main Course
    Cuisine: beverage
    Calories: 90

    Ingredients
      

    • 3 cups ice cubes preferably crushed for easier blending
    • 1/2 cup blue raspberry syrup adjust for sweetness
    • 2 tablespoons granulated sugar optional, for added sweetness
    • 1/2 cup cold water

    Equipment

    • Blender
    • Measuring cups and spoons

    Method
     

    1. Place the ice cubes into the blender, filling it about halfway.
    2. Add the blue raspberry syrup over the ice, followed by the granulated sugar if using.
    3. Pour in the cold water to help the blending process and achieve a smooth consistency.
    4. Secure the lid on the blender and blend on high speed until the mixture is thick, slushy, and evenly combined, about 30-40 seconds.
    5. Stop the blender and check the consistency; it should be icy and smooth with no large ice chunks remaining.
    6. Pour the vibrant blue slushie into glasses, ensuring each is filled generously with the icy, flavorful mixture.
    7. Serve immediately with a straw and enjoy the icy, tart-sweet refreshment.

    Notes

    Adjust the sweetness and tartness by varying the amount of syrup and sugar. For a stronger flavor, add a splash of lemon juice.
    Creating this blue raspberry slushie is a small act of rebellion against the ordinary. It’s a vivid splash of flavor and color that lifts spirits and awakens senses. Playing with bold, nostalgic flavors offers a sweet reminder that sometimes, the simplest recipes can bring the most unexpected delight.

    This recipe is perfect for scorching summer days or anytime you need a quick, cheerful escape. Keep a batch of this slushie ready in your freezer, and you’ll always have a vivid, icy treat at your fingertips—ready to turn any moment into a celebration of flavor.