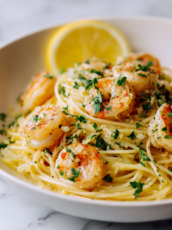
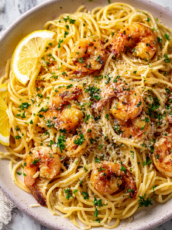
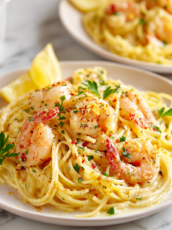
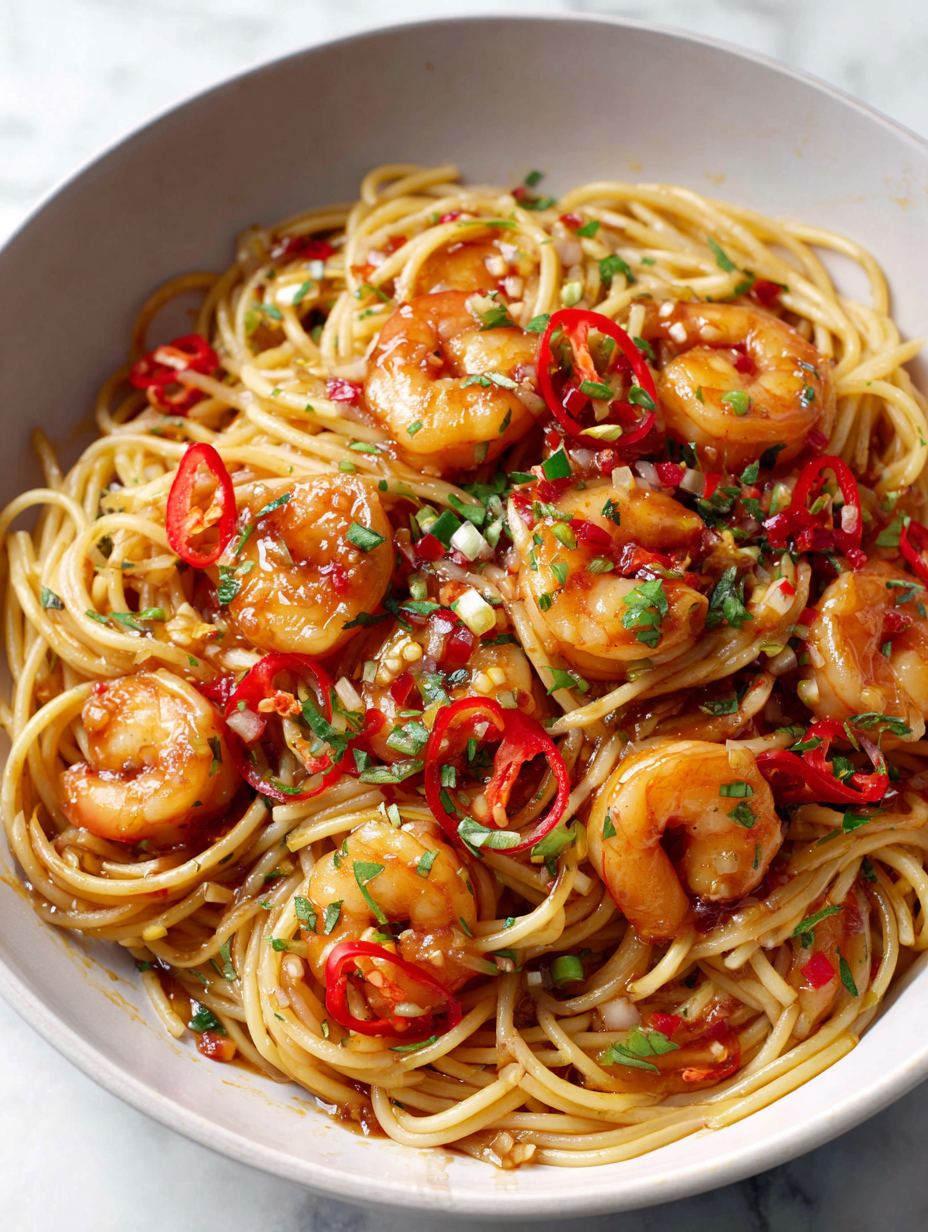
Blog

  • White Chicken Chili: A Cozy Twist for Your Weeknight Dinners

    White Chicken Chili: A Cozy Twist for Your Weeknight Dinners

    Imagine the comforting aroma of simmering chili, but with a gentler, creamier twist that surprises your senses. White chicken chili uses tender shredded chicken and cannellini beans, all bathed in a broth brightened with lime and smoky spices. It’s the kind of dish that whispers warmth and satisfaction, perfect for those chill evenings or when you need a quick, nourishing meal.

    This recipe shines because it’s a game of contrasts: the heat from cumin and chili powder, the coolness of sour cream stirred in at the end, and the buttery pop of fresh cilantro. It’s often overlooked in favor of its red cousin, but it shines equally bright with its subtle, soothing flavors. Once you fall for the gentle, hearty bowl, there’s no going back.

    White Chicken Chili

    White chicken chili is a hearty soup made with shredded chicken, cannellini beans, and a flavorful broth infused with cumin, chili powder, and lime. It has a creamy yet chunky consistency, garnished with fresh cilantro and a swirl of sour cream. The dish combines tender ingredients with spices to create a comforting, textured bowl.
    Prep Time 15 minutes
    Cook Time 30 minutes
    Total Time 45 minutes
    Servings: 4
    Course: Main Course
    Cuisine: American
    Calories: 320

    Ingredients
      

    • 1 lb boneless, skinless chicken breasts or thighs cooked and shredded
    • 2 cans cannellini beans drained and rinsed
    • 4 cups chicken broth
    • 1 cup diced onion
    • 2 teaspoons cumin
    • 1 teaspoon chili powder
    • 1 lime lime juice freshly squeezed
    • 1 cup sour cream for stirring in and serving
    • 2 tablespoons olive oil
    • ½ cup chopped fresh cilantro for garnish

    Equipment

    • Saucepan or Dutch oven
    • Wooden spoon or spatula

    Method
     

    1. Shred cooked chicken into bite-sized pieces, setting aside.
    2. Sauté diced onion in olive oil in a large saucepan over medium heat until translucent and fragrant, about 5 minutes.
    3. Add cumin and chili powder to the onions, stirring for about 30 seconds until spices become aromatic.
    4. Pour in the chicken broth and bring the mixture to a gentle simmer, allowing flavors to meld for 5 minutes.
    5. Add the shredded chicken and cannellini beans to the broth, stirring to combine, then cook for another 10 minutes until heated through.
    6. Stir in fresh lime juice to brighten the flavors, then remove from heat.
    7. Ladle the hot chili into bowls, then swirl in a dollop of sour cream and garnish with chopped cilantro.
    8. Serve immediately, enjoying the creamy, fragrant aroma and hearty texture of the soup.
    This white chicken chili is the kind of dish that feels like a warm conversation on a busy night. It’s swift to prepare and leaves plenty of room to add your own twists — maybe a dash of hot sauce or a sprinkle of feta. Its simplicity makes it a staple you’ll want to keep in the weekly rotation.

    Sharing a bowl of this chili brings a moment of calm and comfort, no matter how hectic the day has been. It’s more than just a meal; it’s a small ritual of care, easy to start and even easier to love.

  • The Effortless Elegance of a Champagne Slushie

    The Effortless Elegance of a Champagne Slushie

    Ever wondered how to bring a touch of sparkle to a hot summer day without turning on the oven? A champagne slushie might be just the celebration your backyard needs. It sizzles with the glitz of bubbly and the chill of frozen fruit, making a simple cocktail feel like a party.

    This recipe transforms your favorite champagne into a frozen delight, perfect for lazy brunches or unexpected guests. It’s surprisingly easy, yet it looks fancy enough to impress even the most discerning eye. Plus, who can resist a drink that’s both refreshing and a little bit glamorous?

    Champagne Slushie

    A champagne slushie is a frozen cocktail made by combining bubbly champagne with sweetened fruit and ice, then blending until smooth. The final texture is icy and refreshing, with a sparkling, vibrant appearance that feels both festive and elegant. Perfect for warm weather gatherings or celebratory moments.
    Prep Time 10 minutes
    Total Time 10 minutes
    Servings: 4
    Course: Main Course
    Cuisine: Fusion
    Calories: 150

    Ingredients
      

    • 1 bottle champagne chilled
    • 1 cup frozen mixed berries
    • 2 tablespoons simple syrup or honey
    • 1 cup ice cubes

    Equipment

    • Blender
    • Measuring cups and spoons

    Method
     

    1. Pour the chilled champagne into the blender.
    2. Add the frozen mixed berries to the blender.
    3. Drizzle the simple syrup over the ingredients in the blender.
    4. Dump the ice cubes into the blender and secure the lid tightly.
    5. Blend on high speed until the mixture is smooth and icy, with a slightly frosty texture that looks velvety and vibrant.
    6. Pour the frozen champagne mixture into glasses, allowing the colorful slush to mound slightly above the rim.
    7. Garnish with a few fresh berries or a sprig of mint if desired for a finishing touch.

    Notes

    Serve immediately for the best icy texture. You can adjust sweetness by varying the amount of simple syrup. For an extra touch, add a slice of lemon or a dash of fresh fruit juice before blending.
    As the sun dips lower, a champagne slushie becomes more than a drink; it’s an experience. The way it shimmers in the glass, catching the fading light, makes every sip feel special. It’s a reminder that simplicity and a touch of sparkle can turn any day into a celebration.

    In a season overflowing with icy treats, this cocktail stands out by adding a bubbly, grown-up twist. Whether served at a gathering or simply enjoyed solo, it’s a delightful way to cool down and lift spirits. Cheers to easy, elegant moments that sparkle just a little brighter.

  • Enchanted Poison Apple Martini: A Spooky Sip for Halloween

    Enchanted Poison Apple Martini: A Spooky Sip for Halloween

    As the leaves turn crisp and the nights grow darker, Halloween craftiness gives way to more daring delights. This Poison Apple Martini transforms the familiar into something truly eerie, with a glow that seems almost unnatural. It’s perfect for those who love a little mystique in their festive spirits.

    Imagine swirling a deep green tint into a classic cocktail, then garnishing it with a sinister twist. The scent of tart apple and hint of citrus in each sip will trigger nostalgia for childhood costume parties—twisted with a grown-up, spooky flair. This recipe is an ode to those who revel in the enchantment of the season.

    ## WHY I LOVE THIS RECIPE?
    – It fuses the innocence of apples with a dangerous-looking color.
    – Creating this drink sparks playful chaos at Halloween gatherings.
    – The glow effect makes it feel almost alive under dim candlelight.
    – It’s a cheerful mix that invites both giggles and gasps.
    – Perfect for breaking out the blender and getting a little wild.

    ## AVOID MY DISASTER (You’re Welcome)
    – FORGOT the glow garnish; left my drink dull and unearthly. (Blinking flashlight saves the day!)
    – DUMPED too much vodka; the drink turned bitter. (A splash of apple juice fixes instantly.)
    – OVER‑TORCHED the sugar rim; it went from shiny to charred. (Use a steady hand and a lighter.)
    – MISSED adding the red food coloring; my poison looked sad and lifeless. (A few drops turn it electric green.)

    ## QUICK FIXES THAT SAVE YOUR DAY
    – When the drink is too tart, SPLASH in a bit more apple juice.
    – When the color isn’t spooky enough, PATCH with extra green food gel.
    – If the glow is weak, SHIELD with a LED tealight underneath.
    – When uneven layers appear, SPLASH a little grenadine for effect.
    – If your rim is sticky, WIPE with a damp cloth before adding sugar.

    This Potion Apple Martini captures the whimsical yet eerie spirit of Halloween with just a few ingredients and a sprinkle of creativity. The striking color and flavorful twist make it an instant crowd-pleaser, whether you’re hosting a party or simply reveling in the spooky season. Cheers to done-up spirits and ghostly good times.

    Poison Apple Martini

    The Poison Apple Martini is a vibrant green cocktail with a glowing, eerie appearance, crafted by blending vodka, sour apple syrup, and citrus juices. The result is a smooth, slightly tart drink with a luminous green hue, garnished with a sinister twist to evoke Halloween mystique.
    Prep Time 5 minutes
    Total Time 5 minutes
    Servings: 2
    Course: Main Course
    Cuisine: festival
    Calories: 180

    Ingredients
      

    • 3 oz vodka preferably chilled
    • 1 oz sour apple liqueur or syrup for the green color and tart flavor
    • 0.5 oz fresh lemon juice adds brightness and balances sweetness
    • 2 drops green food coloring to achieve the eerie glow

    Equipment

    • Cocktail shaker
    • Strainer
    • LED tealight or glow garnish

    Method
     

    1. Fill your cocktail shaker halfway with ice, creating a cool base for mixing.
    2. Pour in the vodka, sour apple syrup, and fresh lemon juice into the shaker.
    3. Add two drops of green food coloring to the mixture, watching it swirl into a vibrant lime-green shade.
    4. Secure the lid tightly on the shaker and shake vigorously for about 15 seconds until the outside becomes frosty and the mixture is well combined.
    5. Strain the chilled mixture into two coupe glasses, ensuring a smooth, glowing green surface free of ice shards.
    6. Place an LED tealight or a glow garnish underneath each glass to accentuate the eerie glow and enhance the spooky effect.
    7. Garnish each glass with a twisted green apple peel or a small apple slice for a sinister finishing touch.
    8. Serve immediately, allowing the glow to cast an otherworldly light as you sip through a straw or straight from the glass.

    Notes

    To enhance the glow effect, keep the LED tealight hidden beneath the glass. Adjust the amount of green food coloring to achieve your preferred brightness. For an extra spooky touch, rim the glass with black or green sugar if desired.
    As the night deepens and shadows stretch longer, these cocktails add that perfect touch of haunted charm. They’re not just drinks; they’re part of the ritual that makes Halloween unforgettable.

    Enjoy crafting this eerie elixir—let its glowing hue and tart allure enchant all who taste it. It’s a delightful reminder that a little spooky fun can turn an ordinary evening into a memorable adventure.

  • Whimsical Vegan Pumpkin Soup: A Cozy Autumn Treasure

    Whimsical Vegan Pumpkin Soup: A Cozy Autumn Treasure

    As the leaves turn fiery orange and the air grows crisp, I find myself craving more than just the usual pumpkin puree. I started exploring unexpected ingredients that elevate this seasonal classic into something memorable. The secret? A splash of coconut milk and a hint of smoked paprika that transform its earthy sweetness into a velvety celebration.

    This isn’t your typical pumpkin soup. It’s a journey into the heart of autumn, where each spoonful whispers stories of cozy kitchens and harvests gone by. Plus, it’s completely vegan, proving that comfort food can be both kind and exhilarating. Let’s dive into a bowl that feels like a warm hug—yet surprises the palate.

    WHY I LOVE THIS RECIPE?

    • The aroma of roasted pumpkin mixed with toasted spices instantly transports me to fall festivals.
    • I love how the silky texture hides a depth of flavor that’s more than just sweet pumpkin.
    • This soup makes me proud—vegan, rich, and utterly satisfying without a drop of cream.
    • It’s a flexible base—add a swirl of almond cream or a pinch of cayenne for custom heat.

    AVOID MY DISASTER (You’re Welcome)

    • FORGOT to stir constantly—caused burnt pumpkin smell. Solution: use a heavy-bottomed pot and stay attentive.
    • DUMPED too much lemon juice—sour clash. Fix: add a pinch of sugar to balance the acidity.
    • OVER-TORCHED the spices—bitterness ensued. Remedy: toast spices gently and remove from heat immediately.
    • FORGOT the coconut milk—resulted in a dull, flat flavor. Remedy: add splash just before blending for creaminess.

    QUICK FIXES THAT SAVE YOUR DAY

    • When the soup gets thick, thin it with a splash of vegetable broth—stirs back to perfect consistency.
    • Spray some pan-fried pumpkin seeds on top for a crunchy, nutty burst.
    • When too bland, stir in a splash of soy sauce or tamari—adds umami magic.
    • When spices burn, quickly add a spoonful of tomato paste—richness and color restored.
    • Splash in apple cider vinegar to brighten flavors if the soup feels dull.

    The current culinary trend leans into warming, plant-based comfort foods, making this vegan pumpkin soup a timely choice. Its rustic charm pairs beautifully with crisp fall days and holiday gatherings alike. It just might become your new seasonal staple, whispering cozy nostalgia with every bowl.

    Plus, it’s a symbol of mindful eating—simple ingredients, big flavor, and a minimal footprint. The act of cooking this soup feels like a gentle ritual, connecting you deeply to the season’s bounty. Sometimes, that’s exactly what the heart needs amid busy lives and changing seasons.

    Vegan Roasted Pumpkin Soup with Coconut Milk and Smoked Paprika

    This vegan pumpkin soup features roasted pumpkin blended into a smooth, velvety puree, combined with coconut milk for creaminess and smoked paprika for depth of flavor. The soup has a rich, silky texture and a warm, orange hue, perfect for cozy fall days. It is simmered to develop deep flavors and finished with a gentle blending process for a glossy, inviting appearance.
    Prep Time 15 minutes
    Cook Time 30 minutes
    Total Time 45 minutes
    Servings: 4
    Course: Main Course
    Cuisine: Vegan
    Calories: 180

    Ingredients
      

    • 1 large Pumpkin (butternut or sugar pumpkin) peeled, seeded, and cut into chunks
    • 2 tablespoons Olive oil for roasting
    • 1 small Onion diced
    • 2 cloves Garlic minced
    • 1 cup Vegetable broth preferably low-sodium
    • 1 cup Coconut milk full-fat for creaminess
    • 1 teaspoon Smoked paprika adds smoky depth
    • to taste Salt and pepper

    Equipment

    • Baking sheet
    • Heavy-bottomed pot
    • Immersion blender or regular blender

    Method
     

    1. Preheat your oven to 400°F (200°C). Arrange the pumpkin chunks on a baking sheet, drizzle with olive oil, and toss to coat evenly. Roast until tender and caramelized, about 25-30 minutes, filling your kitchen with a sweet, nutty aroma.
    2. While the pumpkin roasts, sauté the diced onion in a heavy-bottomed pot with a splash of olive oil over medium heat. Cook until translucent and fragrant, about 5 minutes, releasing a savory aroma and softening the onion for added sweetness.
    3. Add the minced garlic to the onions and cook for another minute until fragrant, being careful not to burn it, as this brings out a warm, aromatic smell.
    4. Once the pumpkin is roasted and cooled slightly, add it to the pot with the sautéed onions and garlic.
    5. Pour in the vegetable broth and bring the mixture to a gentle simmer. Let it cook for about 10 minutes to allow the flavors to meld and the pumpkin to soften further.
    6. Add the smoked paprika and stir well, infusing the soup with a smoky aroma that hints at depth and warmth.
    7. Pour in the coconut milk and stir to combine, creating a creamy, velvety texture that turns the soup into a smooth, inviting orange mixture.
    8. Use an immersion blender or transfer the soup carefully to a blender and blend until completely smooth and creamy, about 1-2 minutes. Be cautious of the hot liquid during blending.
    9. Return the blended soup to the heat, season with salt and pepper to taste, and warm through for another 5 minutes, adjusting seasonings as desired.
    10. Serve the pumpkin soup hot, garnished with your favorite herbs or a drizzle of coconut milk if desired, for a cozy, comforting presentation.

    Notes

    For an extra touch, garnish with toasted pumpkin seeds or a swirl of almond cream. Adjust the smoked paprika level to suit your smoky flavor preference. If the soup gets too thick, stir in a little additional vegetable broth to loosen it up.

    This soup isn’t just another recipe—it’s a little tribute to autumn’s fleeting beauty. Every spoonful carries the warmth of memories and the promise of new traditions. As the season unfolds, I’ll keep returning to this version, adding my own twists and tasting the evolving flavors.

    In the end, a bowl like this reminds us why we cook: to nurture, to celebrate, and to slow down just enough. Whether shared with friends or savored alone, it offers a moment of joy amid the daily rush. Here’s to many cozy dinners wrapped in the gentle embrace of seasonal goodness.

  • Pumpkin Spice Pancakes: Fall’s Cozy Breakfast Revival

    Pumpkin Spice Pancakes: Fall’s Cozy Breakfast Revival

    As the leaves turn and the air crisps, I find myself craving a breakfast that whispers autumn in every bite. These Pumpkin Spice Pancakes do just that—whispering secrets of cozy mornings with the warm aroma of cinnamon, nutmeg, and roasted pumpkin. It’s a ritual I cherish when the mornings get brisk and the world feels just a little more tranquil.

    Imagine fluffly stacks crowned with a pat of melting butter and a drizzle of maple syrup that perfectly counters the spice. The pumpkin adds a velvety texture, making each bite a comforting embrace. This recipe is my small act of seasonal magic, turning simple ingredients into a celebration of fall’s flavors.

    Pumpkin Spice Pancakes

    Pumpkin Spice Pancakes are fluffy breakfast stacks infused with warm fall spices and roasted pumpkin puree. The batter is stirred until smooth and then cooked on a griddle until golden brown, resulting in tender, slightly velvety pancakes with a hint of cinnamon, nutmeg, and pumpkin flavor. They are typically served topped with butter and maple syrup for a cozy, seasonal treat.
    Prep Time 10 minutes
    Cook Time 15 minutes
    Total Time 25 minutes
    Servings: 4
    Course: Main Course
    Cuisine: American
    Calories: 290

    Ingredients
      

    • 1 1/2 cups all-purpose flour sifted
    • 3 teaspoons baking powder
    • 1/2 teaspoon ground cinnamon
    • 1/4 teaspoon ground nutmeg
    • 1/2 teaspoon salt
    • 2 large eggs
    • 1 cup buttermilk or regular milk mixed with a splash of vinegar
    • 1/2 cup roasted pumpkin puree smooth and thick
    • 2 tablespoons granulated sugar
    • 2 tablespoons unsalted butter melted, for the batter

    Equipment

    • Mixing bowls
    • Whisk
    • Griddle or non-stick skillet
    • Spatula
    • Measuring cups and spoons

    Method
     

    1. In a large mixing bowl, whisk together the sifted flour, baking powder, ground cinnamon, ground nutmeg, salt, and sugar until evenly combined. This dry mix creates the foundation for fluffy, well-spaced pancakes.
    2. In a separate bowl, beat the eggs until lightly frothy, then stir in the buttermilk, melted butter, and roasted pumpkin puree until the mixture is smooth and consistent. This helps incorporate the flavors and liquids evenly.
    3. Pour the wet ingredients into the dry ingredients and gently fold the mixture together with a spatula. Stop mixing once just combined; a few lumps are fine—the batter should be thick but pourable, with no streaks of flour.
    4. Preheat a griddle or non-stick skillet over medium heat until hot—look for a light shimmer or a few drops of water bouncing on the surface. Lightly grease with a bit of butter or oil.
    5. Scoop about 1/4 cup of batter onto the hot surface for each pancake. Cook until bubbles form on the surface and the edges look set, about 2-3 minutes. The pancakes will smell fragrant and start to turn golden at the edges.
    6. Carefully flip each pancake and cook for another 2-3 minutes until golden brown on both sides and cooked through inside. Adjust heat if pancakes brown too quickly or unevenly.
    7. Transfer the cooked pancakes to a plate and keep warm while you cook the remaining batter. Repeat the process, rerolling the skillet temperature as needed for evenly golden pancakes.
    8. Serve the pumpkin spice pancakes hot, topped with pats of butter and drizzled generously with maple syrup. The aroma should be inviting, and the pancakes should be fluffy and tender with a hint of spice.

    Notes

    For extra fall flavor, add a handful of chopped pecans or walnuts to the batter before cooking.

    This pumpkin spice pancake recipe is a gentle reminder that breakfast can be a small celebration of the season’s best. It’s a simple, warm memory-maker that turns an ordinary morning into something special. Once you’ve tasted that first fluffy bite, the season feels just a little more magical.

    As the days grow shorter and the air gets brisker, these pancakes are perfect for slowing down and savoring. They invite you to enjoy the most comforting flavors of fall—spicy, sweet, and utterly inviting—on a lazy weekend morning or a busy weekday brunch.

  • Chill Out Unexpectedly: The Vanilla Slushie You Never Knew You Needed

    Chill Out Unexpectedly: The Vanilla Slushie You Never Knew You Needed

    Imagine anchoring your hot summer day with a surprisingly sophisticated twist—vanilla slushie, but not the usual kind. This recipe takes the classic frozen treat and elevates it with a hint of vanilla bean, creating a smooth, aromatic burst of cold that melts just right on your tongue. It’s a secret weapon for turning mundane moments into small celebrations.

    What sets this vanilla slushie apart is its simplicity paired with a gentle, luxurious flavor. It’s perfect for those moments when you crave something chilled but don’t want the typical fruit punch or sugary syrup. Plus, the aroma of vanilla baking in your mouth as you sip makes it a truly comforting refreshment.

    Vanilla Slushie

    This vanilla slushie is a chilled, aromatic frozen beverage made with vanilla bean, milk, and sugar, blended to a smooth, icy consistency. The result is a velvety, snow-like texture with a fragrant vanilla aroma, perfect for hot summer days.
    Prep Time 10 minutes
    Total Time 10 minutes
    Servings: 2
    Course: Main Course
    Cuisine: Western
    Calories: 120

    Ingredients
      

    • 1 large vanilla bean split lengthwise and scraped
    • 1 cup milk whole milk or your preferred type
    • 2 tablespoons granulated sugar or adjust to taste
    • 2 cups ice cubes crushed or regular

    Equipment

    • Blender
    • Measuring cups and spoons
    • Knife
    • Cutting board

    Method
     

    1. Using a sharp knife, carefully split the vanilla bean lengthwise and scrape out the tiny seeds with the back of the knife.
    2. Pour the milk into a blender, then add the vanilla bean seeds and the split pod for extra flavor.
    3. Measure in the sugar and sprinkle it over the milk mixture, gently stirring or blending briefly just to combine.
    4. Add the ice cubes to the blender, distributing them evenly around the liquid mixture.
    5. Secure the lid on the blender and pulse on high for about 30-60 seconds until the mixture is smooth, icy, and slightly frosty at the edges.
    6. Check the consistency—if it’s too thick, add a splash more milk; if too thin, add a few more ice cubes and blend briefly again.
    7. Once the mixture is smooth, pour the vanilla slushie into chilled glasses and serve immediately for the best icy texture.

    Notes

    For a stronger vanilla flavor, let the vanilla pod steep in the milk for 30 minutes before blending.

    This vanilla slushie recipe is more than just a cool-down; it’s a small nostalgia trip in every sip. It’s ideal for lazy afternoons or unexpected visitors—ready in minutes, and endlessly adaptable with toppings or a splash of your favorite spirit.

    Trying this out lets you capture the essence of summer in a glass or a cup. Keep the vanilla rich and pure, and you’ll have a versatile treat that stays special no matter the season. Sometimes, the simplest ideas make the biggest difference in our everyday joy.

  • Spooky Sweetness: Halloween Candy Corn Parfaits to Charm Every Gourd

    Spooky Sweetness: Halloween Candy Corn Parfaits to Charm Every Gourd

    As fall settles in, I often find myself craving a dessert that captures the playful spirit of Halloween without the sticky mess. Enter these Candy Corn Parfaits—an unexpected twist on classic treats that combines nostalgic charm with a sophisticated layered look. Plus, they can be assembled in minutes, making them perfect for spontaneous spooky celebrations.

    Each spoonful offers a delightful crunch, a whisper of vanilla, and that unmistakable sweet-vanilla-orange-yellow candy harmony. These parfaits transform simple ingredients into a visual spectacle on your table, perfect for impressing kids and adults alike while embracing that whimsical October vibe. They’re a sweet reminder that sometimes, the smallest treats hold the biggest smiles.

    Candy Corn Parfaits

    Candy Corn Parfaits are layered dessert cups that mimic the look of traditional candy corn using a combination of sweetened whipped cream, vanilla pudding, and colorful crushed candies. The dish features vibrant layers with a crunchy texture contrasted by creamy filling, creating an eye-catching presentation with a sweet, vanilla-orange flavor profile.
    Prep Time 10 minutes
    Cook Time 10 minutes
    Total Time 20 minutes
    Servings: 4
    Course: Main Course
    Cuisine: American
    Calories: 250

    Ingredients
      

    • 1 cup heavy cream chilled, for whipping
    • 2 cups vanilla pudding prepared or instant
    • 1/2 cup sugar for sweetening whipped cream if desired
    • 1 teaspoon vanilla extract for flavor
    • 1/2 cup crushed candy corn for color and crunch

    Equipment

    • Mixing bowls
    • Whisk
    • Glasses or serving cups
    • Spatula
    • Measuring cups and spoons

    Method
     

    1. Begin by whipping the chilled heavy cream in a mixing bowl until soft peaks form, looking fluffy and slightly stiff to the touch.
    2. If desired, gently fold in sugar and vanilla extract into the whipped cream for added sweetness and flavor, being careful not to deflate the mixture.
    3. Pour the vanilla pudding into a large mixing bowl and whisk until smooth and slightly thickened.
    4. Layer the parfaits starting with a spoonful of vanilla pudding at the bottom of each glass or cup.
    5. Add a layer of whipped cream over the pudding, creating a smooth, fluffy layer on top.
    6. Sprinkle a layer of crushed candy corn over the whipped cream, adding color and crunch for texture.
    7. Repeat the layering process—pudding, whipped cream, then crushed candy corn—until the glasses are filled, finishing with a topping of whipped cream.
    8. Top each parfait with extra crushed candy corn or a small candy corn piece for a festive finish.
    9. Chill the parfaits in the refrigerator for at least 10 minutes to allow flavors to meld and the layers to set slightly before serving.
    10. Serve chilled and enjoy the colorful, crunchy, and creamy treat that evokes the fun spirit of Halloween.

    Notes

    You can customize this recipe by using different colored candies or adding a drizzle of caramel or chocolate for extra flavor.

    Whether it’s a last-minute party or a quiet evening of movie marathons, these Candy Corn Parfaits bring a splash of Halloween magic. Their bright layers and nostalgic flavor-ride make every bite feel like a mini celebration. Plus, they’re endlessly customizable—swap vanilla pudding for chocolate, or add a sprinkle of crushed graham crackers for extra texture.

    As the season shifts, I find these parfaits remind me of childhood scoops of vanilla and bright orange candy, all wrapped into one charming dessert. They’re simple, sweet, and just the right touch of chaos that makes fall so special. Enjoy each spoonful and let the vibrant colors do the talking—happy haunting!

  • The Hidden Charm of Turkey Chili: A Cozy Winter Surprise

    The Hidden Charm of Turkey Chili: A Cozy Winter Surprise

    Few dishes evoke the warmth of a chilly evening like a hearty bowl of turkey chili. But what if you could elevate this comfort food with a surprising twist that will make your taste buds dance? I discovered that swapping ground beef for lean turkey doesn’t just cut calories; it adds a subtle, savory depth that pairs beautifully with smoky spices and roasted veggies. This recipe is my secret weapon for sneaking wholesome ingredients into a dish that’s already so inviting.

    Imagine the aroma of cumin, ancho chili, and garlic simmering together, hinting at adventures from distant lands. The process is straightforward, but the flavor list feels like a carefully curated spice market. It’s deeply satisfying to serve a bowl that looks rich but feels light, especially when topped with a dollop of sour cream and a handful of fresh cilantro. This turkey chili doesn’t just fill the belly—it sparks joy during the chilliest nights.

    **WHY I LOVE THIS RECIPE?**

    • The aroma instantly lifts my mood, filling the house with warm, spicy goodness.
    • It’s a perfect way to use up leftovers, turning them into something spectacular.
    • Each spoonful offers a balanced mix of heat, sweetness from peppers, and savory turkey.
    • The simplicity of assembly makes it ideal for busy weeknights yet impressive enough for guests.
    • It reminds me of childhood winter dinners, comfort that stays with me.

    **AVOID MY DISASTER (You’re Welcome)**

    • FORGOT to drain the excess grease—ended up with greasy chili; fix: rinse and pat dry.
    • DUMPED too much salt—made it inedible; fix: add a splash of vinegar or sugar.
    • OVER-TORCHED the onions—bitter flavor; fix: add a little broth and scrap the burnt bits.
    • FORGOT to check the simmer—watered-down flavor; fix: simmer longer uncovered for concentration.

    **QUICK FIXES THAT SAVE YOUR DAY**

    • When too bland, splash in a splash of lime juice and stir.
    • Patch over a smoky taste with a dollop of Greek yogurt.
    • Shield from over-spicing by adding a handful of shredded zucchini—cools spices and adds moisture.
    • When ingredients are missing, toss in a can of diced tomatoes for richness.
    • Drop a bay leaf during simmering for added depth and aroma—crackle as it dissolves.

    In the end, this turkey chili becomes more than just a weekday meal. It’s a reminder that simple ingredients, when thoughtfully combined, create moments of genuine comfort. As the season changes and you seek warmth in familiar flavors, this dish delivers with ease and heart. It’s guaranteed to become part of your winter rotation, no matter how hectic life gets.

    Turkey Chili

    This turkey chili is a hearty stew made with lean ground turkey simmered with spices, roasted vegetables, and tomatoes. It develops a rich, thick texture with a flavorful, smoky aroma from cumin, chili powder, and garlic, topped with fresh herbs and a dollop of sour cream for creaminess.
    Prep Time 15 minutes
    Cook Time 30 minutes
    Total Time 45 minutes
    Servings: 4
    Course: Main Course
    Cuisine: American
    Calories: 350

    Ingredients
      

    • 1 lb lean ground turkey preferably lean
    • 1 medium onion diced
    • 3 cloves garlic minced
    • 2 cups roasted peppers chopped
    • 1 can (14.5 oz) diced tomatoes with liquid
    • 2 tbsp chili powder smoky
    • 1 tsp ground cumin
    • to taste salt and pepper
    • 1 tablespoon olive oil
    • 0.5 cup shredded cheese optional, for topping
    • 1 cup sour cream for serving
    • a handful fresh cilantro chopped, for garnish

    Equipment

    • Large skillet or Dutch oven
    • Wooden spoon or spatula

    Method
     

    1. Heat olive oil in a large skillet over medium heat. Add diced onion and cook until it becomes translucent and fragrant, about 3-4 minutes.
    2. Add minced garlic to the skillet and cook for another 30 seconds until it releases a fragrant aroma.
    3. Pour in the ground turkey and break it apart with a wooden spoon, cooking until it’s browned all over and no pink remains, about 5-6 minutes.
    4. Add the chopped roasted peppers to the skillet for a smoky flavor, stirring to combine.
    5. Stir in chili powder, cumin, salt, and pepper to coat the meat and vegetables evenly, allowing the spices to toast slightly and become fragrant.
    6. Pour in the diced tomatoes with their liquid, stirring well to combine all ingredients.
    7. Bring the mixture to a gentle simmer, then reduce heat to low and let it cook uncovered for 20-25 minutes, stirring occasionally until thickened and flavors meld.
    8. Taste and adjust seasoning with more salt or pepper as needed, then remove from heat.
    9. Serve the hot chili in bowls, topped with shredded cheese, a dollop of sour cream, and a sprinkle of chopped cilantro for freshness.

    This recipe isn’t just about filling your belly—it’s about creating nourishing moments amid busy days. The gentle heat and savory profile make it perfect for sharing, whether with family or a quiet evening alone. Every spoonful rekindles memories of chilly nights spent cozying up with good food and good company.

    While ingredients can be flexible, the spirit of this dish lies in its warmth and simplicity. It’s proof that an excellent chili doesn’t need exotic ingredients—just honest flavors and a little patience. As you ladle this into bowls, you’re holding more than just dinner—you’re holding a small piece of comfort that satisfies mind, body, and soul.

  • Falling for Fall: The Cozy Chicken Casserole Challenge

    Falling for Fall: The Cozy Chicken Casserole Challenge

    As autumn leaves start to carpet the ground, I find myself craving more than just pumpkin spice—I want comfort that feels like a warm sweater. This Easy Fall Chicken Casserole is my secret weapon for busy weeknights when nostalgia and flavor collide in the oven. Each bubbling, cheesy bite is a reminder of family dinners long past, wrapped in the scent of roasted vegetables and fragrant herbs.

    I’ve discovered that the secret to transforming simple ingredients into a heartwarming dish lies in embracing the chaos—layering flavors, tossing in a dash of autumn spices, and trusting the oven to do its magic. It’s about making the kitchen smell like a cozy retreat, where every spoonful sparks a smile or a memory.

    This casserole isn’t just comfort food; it’s a celebration of seasonality and the joy of easy cooking. With ingredients that are likely in your pantry, it’s a reminder that comfort can be quick, nourishing, and deeply satisfying.

    Easy Fall Chicken Casserole

    This chicken casserole combines tender cooked chicken and roasted vegetables layered with creamy, cheesy sauce, then baked until bubbling and golden on top. The dish features a hearty, comforting texture with a rich, savory flavor profile enhanced by autumn spices. Its appearance is a warm, bubbly casserole with a crispy, cheesy crust and vibrant vegetable layers.
    Prep Time 15 minutes
    Cook Time 40 minutes
    Total Time 55 minutes
    Servings: 4
    Course: Main Course
    Cuisine: American
    Calories: 450

    Ingredients
      

    • 2 cups cooked chicken, shredded preferably roasted or boiled
    • 2 cups roasted mixed vegetables carrots, celery, bell peppers
    • 1 cup shredded cheese cheddar or mozzarella
    • 1 cup milk whole or 2%
    • 2 tablespoons butter
    • 2 tablespoons flour
    • 1 teaspoon autumn spice blend cinnamon, nutmeg, cloves
    • 1/2 teaspoon salt
    • 1/4 teaspoon black pepper
    • 1/2 cup bread crumbs for topping

    Equipment

    • Baking dish
    • Large Skillet
    • Mixing bowl
    • Knife
    • Cutting board
    • Measuring cups and spoons
    • Whisk

    Method
     

    1. Preheat your oven to 375°F (190°C). Grease a baking dish to prepare for assembling the casserole.
    2. Chop roasted vegetables into bite-sized pieces and shred the cooked chicken if not already prepared. Set aside.
    3. Melt butter in a large skillet over medium heat, then whisk in flour to form a smooth roux. Cook for about a minute until lightly golden and fragrant.
    4. Gradually whisk in milk, continuing to stir until the sauce thickens and becomes creamy, about 3-4 minutes. Stir in autumn spices, salt, and pepper to infuse warm flavors.
    5. Add shredded chicken, roasted vegetables, and shredded cheese into the sauce, folding gently until combined and heated through.
    6. Pour the mixture into your prepared baking dish, spreading it evenly.
    7. Sprinkle bread crumbs and an additional handful of cheese over the top for a crispy, cheesy crust.
    8. Bake in the preheated oven for 25-30 minutes, until bubbly and golden brown on top.
    9. Remove from the oven and let rest for 5 minutes to settle before serving, revealing a bubbling, cheesy, and fragrant casserole.
    As the casserole emerges golden and bubbling, you’ll notice how the aroma alone makes the house feel warmer. It’s perfect for sharing on those rushed weekday evenings or lazy weekends spent reminiscing over seasonal scents.

    This dish captures the essence of fall—simple, hearty, and deeply nostalgic. It’s a reminder that sometimes, the tastiest moments are born from the simplest ingredients, baked with love and a touch of seasonal magic.

  • Chill Out with This Unique Coffee Slushie Hack!

    Chill Out with This Unique Coffee Slushie Hack!

    Imagine strolling through a bustling city street on a blazing summer day. The air is heavy, and all you crave is a cold, refreshing escape. This coffee slushie isn’t just your average cold brew; it’s a secret weapon against the heat that uses unexpected ingredients to surprise your taste buds.

    In my quest for the perfect icy treat, I discovered that blending leftover brewed coffee with a splash of condensed milk and a pinch of sea salt creates a texture that’s velvety yet icy. It’s a playful mix of bitter and sweet with a whisper of salt, making every sip an adventure. Plus, it’s so easy that even a chaotic kitchen can turn out a masterpiece.

    Now, imagine serving this slushie at your next gathering or simply as a solo oasis after a long day. It’s a method to turn mundane coffee into a dazzling, crowd-pleasing frozen delight—proof that what’s leftover in the fridge can become a showstopper.

    Coffee Slushie

    A coffee slushie is a frosty, frozen beverage made by blending leftover brewed coffee with sweetened condensed milk and salt, creating a velvety yet icy texture. It presents a marbled look with a balance of bitter, sweet, and salty flavors, and is served as a refreshing treat on hot days.
    Prep Time 5 minutes
    Total Time 5 minutes
    Servings: 2
    Course: Main Course
    Cuisine: International
    Calories: 150

    Ingredients
      

    • 1 cup leftover brewed coffee chilled
    • 2 tablespoons sweetened condensed milk adjust to taste
    • a pinch sea salt
    • 1 cup ice cubes

    Equipment

    • Blender
    • Measuring cups and spoons
    • Ice cube tray

    Method
     

    1. Measure out the chilled leftover brewed coffee and pour it into your blender.
    2. Add the sweetened condensed milk to the blender, which will give the slushie a rich sweetness and creaminess.
    3. Sprinkle a pinch of sea salt into the mixture; this enhances the flavor and balances the sweetness.
    4. Drop in the ice cubes, ensuring they’re evenly distributed for smooth blending.
    5. Secure the lid on the blender and blend on high speed until the mixture is smooth, thick, and resembles a marbled, slushie consistency. This may take about 30-60 seconds.
    6. Check the texture; it should be icy yet scoopable, with a velvety appearance. Pour into glasses.
    7. Optionally, garnish with a drizzle of condensed milk or a few coffee beans for presentation.
    8. Serve immediately with a straw or spoon, and enjoy this refreshing coffee treat.

    This coffee slushie is more than just a cold brew rescue; it’s an unexpected ritual for the warmer days ahead. Its simplicity makes it an instant favorite, whispering that the best pleasures often come from leftovers and spontaneous ideas.

    As the summer heat intensifies, this icy treat keeps my kitchen cool and my spirits high. It’s a reminder that in the chaos of everyday life, a little creativity can make all the difference—plus, it tastes remarkably good lately.